
Call us in Seattle
+1 (800) 871-6550
Blog:
Using a VPN on embedded Linux systems
Monday, April 26, 2021
Networking requirements are beginning to become more and more common in various embedded applications, and with this comes the security challenges of data transmission. A VPN is an effective way of dealing with this challenge. In addition, VPNs can penetrate firewalls or NAT for remote networking purposes, providing embedded systems with access to remote networks. This article demonstrates how to use OpenVPN and WireGuard, two popular VPN protocols, on an Apalis iMX8QM running Linux. If you are using Torizon, it will be easy to use VPN on it. Follow the guide on this page.
OpenVPN is a widely used VPN protocol that supports multiple OpenSSL-based encryption schemes. It can use either TCP or UDP as the transport layer protocol, making it highly flexible. WireGuard is a fast, simple VPN protocol that offers higher efficiency than OpenVPN. It was originally implemented directly within the Linux kernel, and it supports the latest encryption algorithms: Curve25519, ChaCha20, Poly1305, BLAKE2, etc. The transport layer uses the UDP protocol. Since Linux 5.6, WireGuard has been integrated into the kernel; currently, it has a very active development community, supporting Windows, macOS, BSD, iOS and Android. The BSP that Toradex maintains for its modules is built on the Yocto Project, and adding OpenVPN and WireGuard to a Yocto deployment is easy.
First, add the following line to the local.conf configuration file. (The Apache web server is used for a remote connection demonstration later.)
IMAGE_INSTALL_append = " apache2 openvpn wireguard-module wireguard-tools"
Next, edit layers/meta-openembedded/meta-networking/recipes-kernel/wireguard/wireguard-module_1.0.20200401.bb and comment out PKG_${PN} = "kernel-module-${MODULE_NAME}" as shown below.
# Kernel module packages MUST begin with 'kernel-module-', otherwise# multilib image generation can fail.## The following line is only necessary if the recipe name does not begin# with kernel-module-.#PKG_${PN} = "kernel-module-${MODULE_NAME}"
WireGuard’s implementation is based on the Linux kernel. In order to maintain the simplicity of its code, it reuses many networking functions in the kernel, so the default Yocto Project kernel configuration needs to be modified. If you use OpenVPN, you can skip this step and directly compile the BSP..
$ MACHINE=apalis-imx8 bitbake -c menuconfig virtual/kernel
Networking support → Networking options [*] IP: advanced router[*] FIB TRIE statistics[*] IP: policy routing [*] IP: equal cost multipath [*] IP: verbose route monitoring
Networking support → Networking options → Network packet filtering framework (Netfilter) → IP: Netfilter Configuration<M> raw table support (required for NOTRACK/TRACE)
Networking support → Networking options → Network packet filtering framework (Netfilter) → Core Netfilter Configuration<M> "CONNMARK" target support <M> "MARK" target support
*** Xtables matches *** <M> "comment" match support<M> "mark" match support <M> "connmark" connection mark match support
After reconfiguring the kernel, compile the BSP
$ MACHINE=apalis-imx8 bitbake tdx-reference-minimal-image
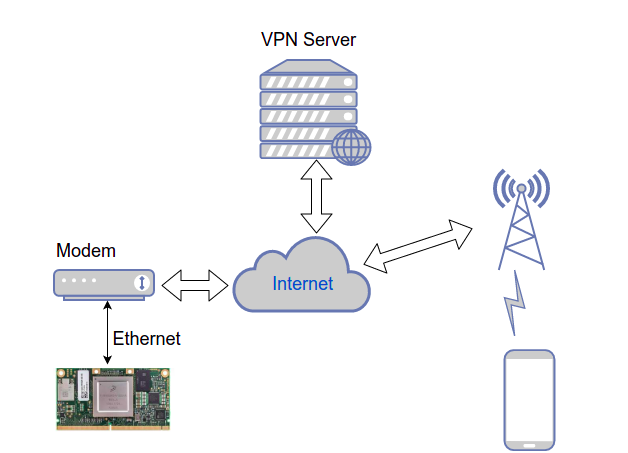
Before discussing how to configure a VPN, we’ll first introduce the network topology used in this test. As shown in the figure below, you’ll need a server with a public IP as the VPN server. The Apalis iMX8QM connects to optical modems provided by telecom operators via Ethernet. At present, the optical modem can only obtain the intranet IPv4 address that has been converted by the telecom operator's NAT. The mobile phone used for the test is connected to the public network through a base station.

VPN server settings
The official websites for both OpenVPN and WireGuard provide detailed server configuration instructions. Here, we use another tool, called PiVPN, to set up the server. PiVPN was originally a simple server management tool for Raspberry Pi, but it can also be used in any Debian-based distribution, such as Ubuntu. Run the following command to install it.
curl -L $ https://install.pivpn.io | bash
Then, run pivpn twice to add OpenVPN and WireGuard accounts for the Apalis iMX8 and mobile phones.
$ pivpn ovpn add$ pivpn wg add
Next, modify the network configuration on the server.
$ sudo iptables -A FORWARD -i wg0 -o wg0 -j ACCEPT $ vi /etc/sysctl.confnet.ipv4.ip_forward = 1$ sysctl -p /etc/sysctl.conf
Mobile settings
Install the OpenVPN and WireGuard clients on your phone. Then, either import the ovpn or conf file generated by PiVPN above, or scan the QR code. PiVPN provides very easy-to-use functions.
Apalis iMX8QM settings
Use system-networkd as the network manager.
root@apalis-imx8:~# systemctl disable connmanroot@apalis-imx8:~# ln -s /run/systemd/resolve/resolv.conf /etc/resolv.conf
Set the network interface to dynamically obtain an IP address.
root@apalis-imx8:~# vi /etc/systemd/network/wired.network[Match]Name=eth0[Network]DHCP=ipv4
Modify the default display content of the Apache web server. Other clients can use HTTP to access the web page.
/usr/share/apache2/default-site/htdocs/index.html<html><body><h1>It works! Apalis iMX8.</h1></body></html>
OpenVPN
Open the OpenVPN configuration file with openvpn.
root@apalis-imx8:~# openvpn apalis-imx8.ovpn
If successful, you will see the following information:
Thu Jan 28 03:16:44 2021 OpenVPN 2.4.9 aarch64-tdx-linux-gnu [SSL (OpenSSL)] [LZO] [LZ4] [EPOLL] [MH/PKTINFO] [AEAD] built on Apr 16 2020Thu Jan 28 03:16:44 2021 library versions: OpenSSL 1.1.1i 8 Dec 2020, LZO 2.10Enter Private Key Password:Thu Jan 28 03:16:52 2021 /sbin/ip link set dev tun0 up mtu 1500Thu Jan 28 03:16:52 2021 /sbin/ip addr add dev tun0 10.8.0.5/24 broadcast 10.8.0.255Thu Jan 28 03:16:52 2021 /sbin/ip route add 125.107.107.37/32 via 192.168.123.1Thu Jan 28 03:16:52 2021 /sbin/ip route add 0.0.0.0/1 via 10.8.0.1Thu Jan 28 03:16:52 2021 /sbin/ip route add 128.0.0.0/1 via 10.8.0.1Thu Jan 28 03:16:52 2021 Initialization Sequence Completed
To confirm that the VPN is active, look for the tun0 interface in the output of ifconfig, as shown here. The assigned IP is 10.8.0.5. Other clients connected to the VPN can use this IP to access the Apalis iMX8QM.
tun0 Link encap:UNSPEC HWaddr 00-00-00-00-00-00-00-00-00-00-00-00-00-00-00-00 inet addr:10.8.0.5 P-t-P:10.8.0.5 Mask:255.255.255.0 inet6 addr: fe80::cd6f:13cd:62e9:4d1e/64 Scope:Link UP POINTOPOINT RUNNING NOARP MULTICAST MTU:1500 Metric:1 RX packets:2 errors:0 dropped:0 overruns:0 frame:0 TX packets:16 errors:0 dropped:0 overruns:0 carrier:0 collisions:0 txqueuelen:100 RX bytes:190 (190.0 B) TX bytes:1006 (1006.0 B)
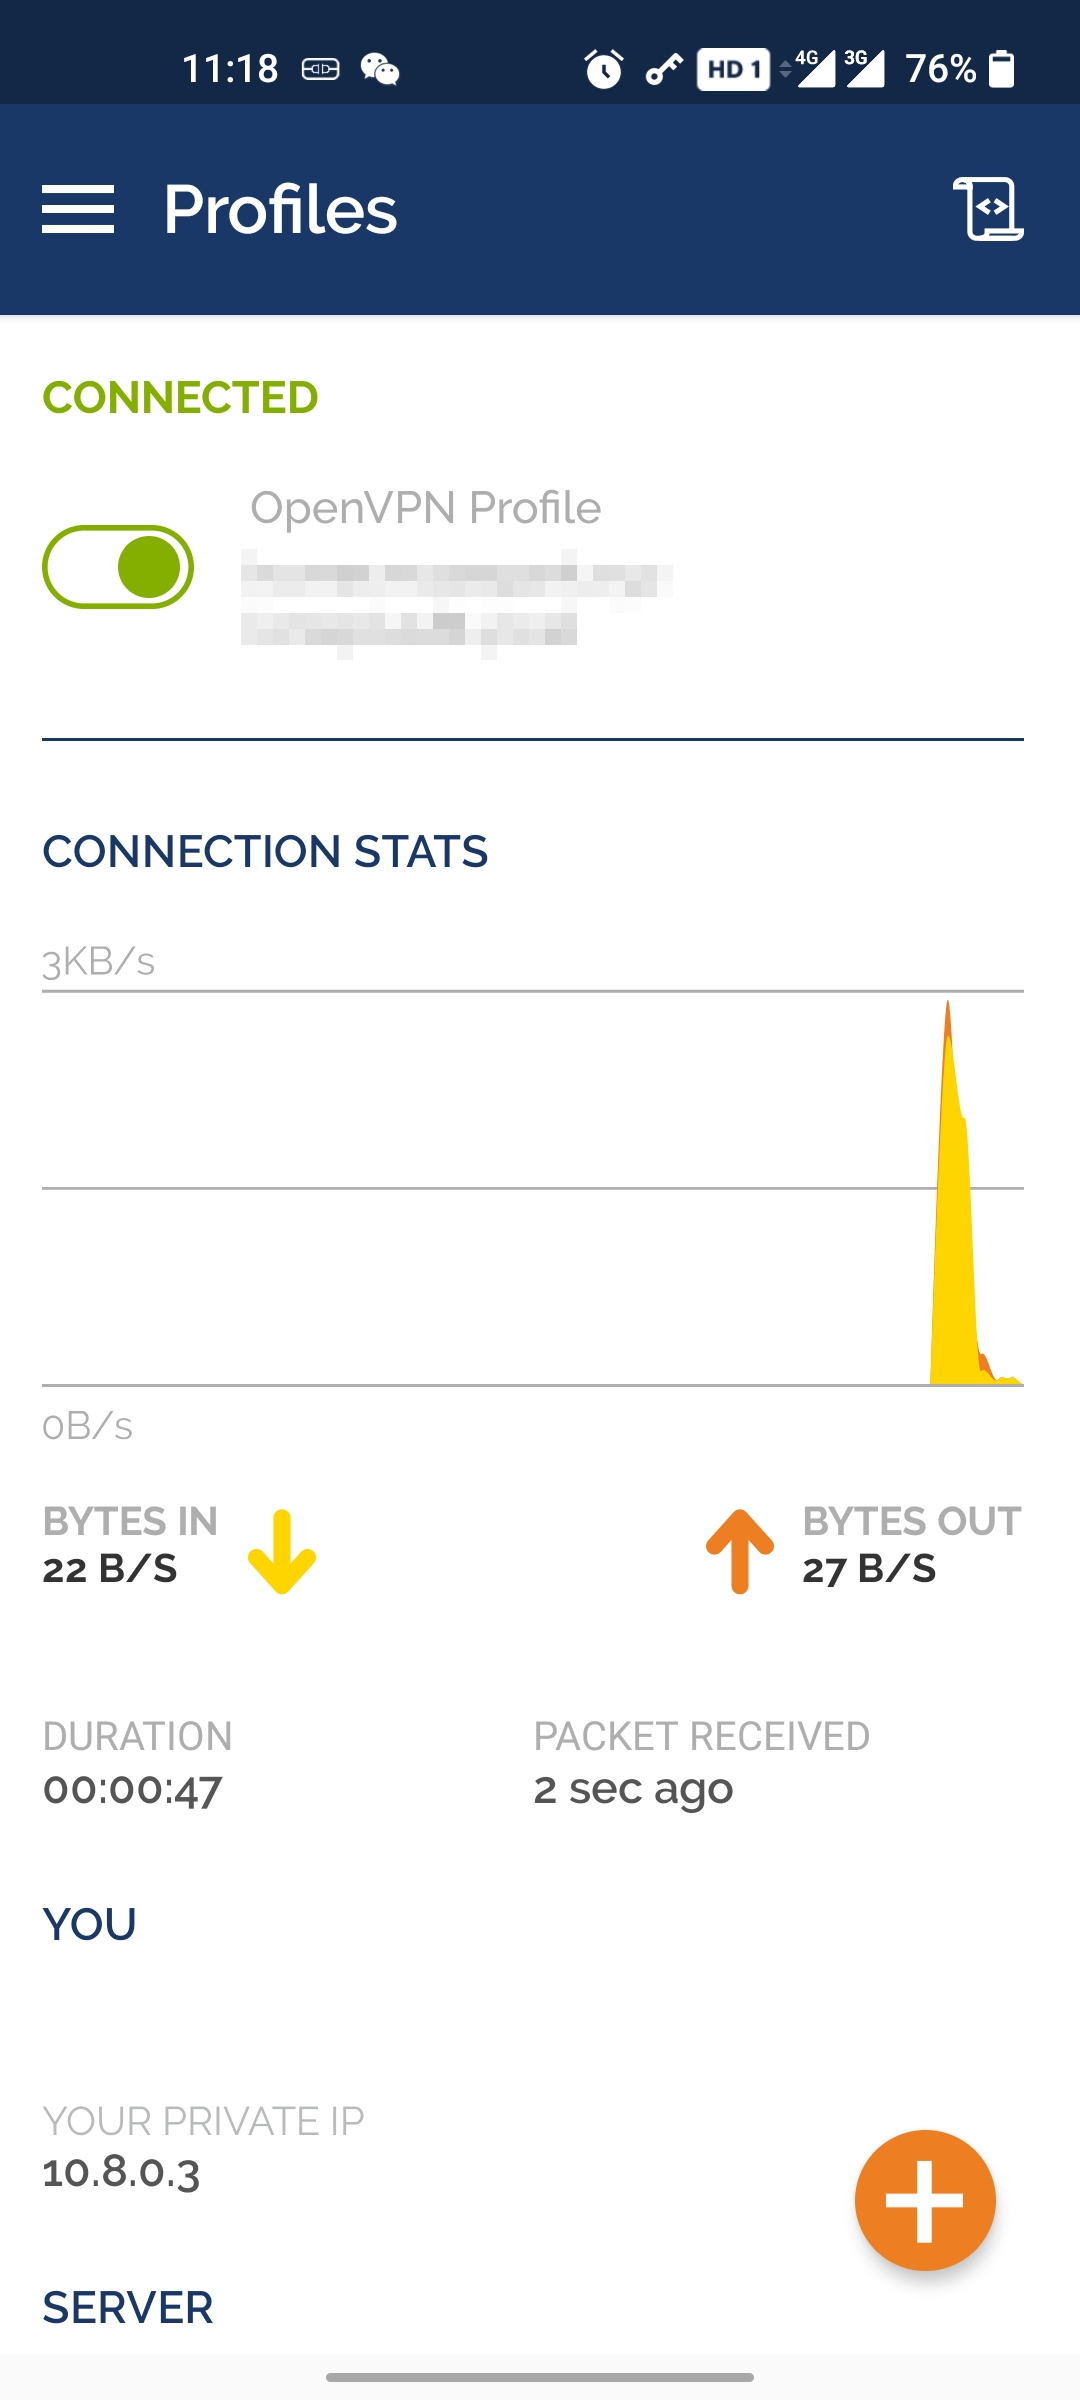
Connect OpenVPN on the mobile phone and confirm that the assigned IP is 10.8.0.3. Navigating to http://10.8.0.5 in the phone’s browser connects to the Apache server running on the Apalis iMX8QM.

WireGuard
Copy the configuration file apalis-imx8.conf generated by PiVPN to /etc/wireguard/wg0.conf, and then load it using wg-quick.
root@apalis-imx8:~# wg-quick up wg0
Find the wg0 interface in the output of ifconfig. The assigned IP is 10.6.0.5.
wg0 Link encap:UNSPEC HWaddr 00-00-00-00-00-00-00-00-00-00-00-00-00-00-00-00 inet addr:10.6.0.5 P-t-P:10.6.0.5 Mask:255.255.255.0 UP POINTOPOINT RUNNING NOARP MTU:1420 Metric:1 RX packets:63 errors:0 dropped:0 overruns:0 frame:0 TX packets:127 errors:0 dropped:0 overruns:0 carrier:0 collisions:0 txqueuelen:1000 RX bytes:6540 (6.3 KiB) TX bytes:15988 (15.6 KiB)
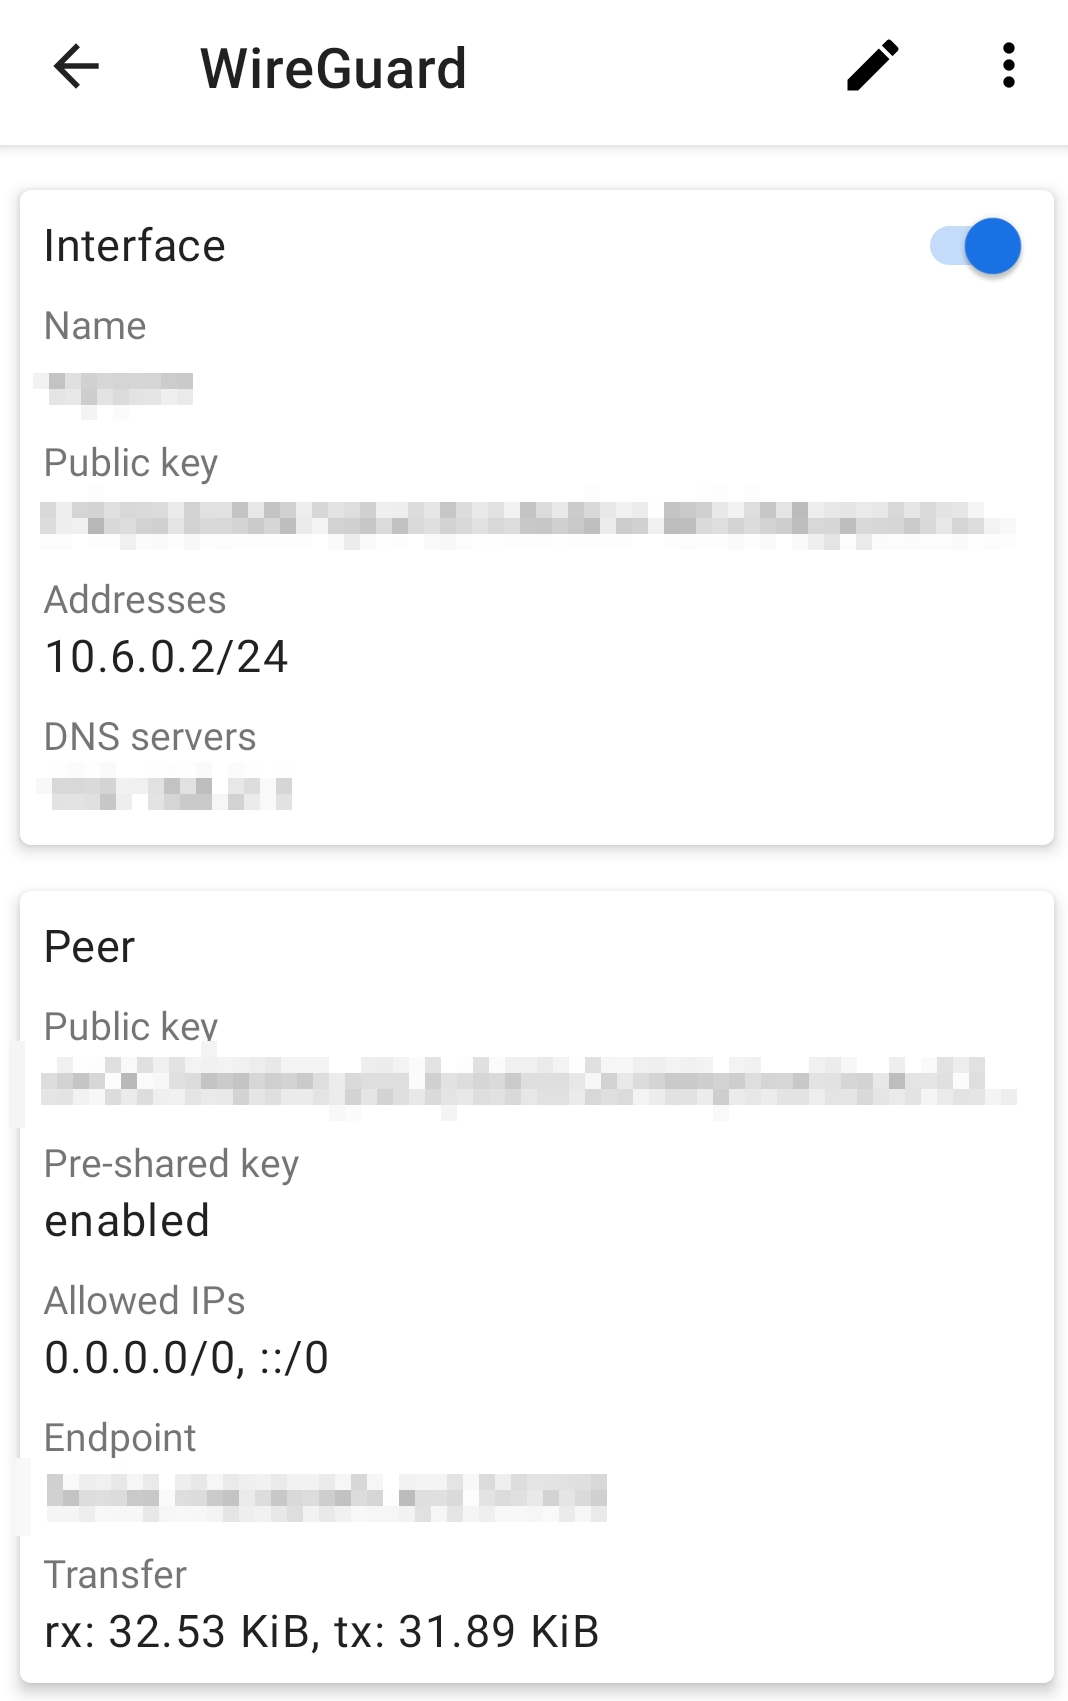
Just like in the OpenVPN example, after establishing a connection from the WireGuard mobile app, you can connect to the Apache server on the Apalis iMX8QM by navigating to http://10.6.0.5 in the phone’s browser.

Conclusion
VPNs can connect devices located within different networks, which is convenient for remote management. However, you should be sure to provide adequate security measures for the server to prevent attackers from accessing authentication details and other information about connected devices.
Author: Shanfeng Hu, FAE, Toradex
Leave a comment
Please login to leave a comment!
Latest Blog
Friday, May 31, 2024
Friday, April 5, 2024