Blog:
First Steps Developing Embedded Applications using Heterogeneous Multicore Processors – Compiling and Deploying Applications on the Cortex-M core is easy!
Every day, new heterogeneous multicore processors/System on Chips (SoCs) are launched in the market. The incorporation of microcontrollers and peripheral cores on SoCs is becoming a very common practice, look at the latest releases of NXP®: i.MX 6SoloX, i.MX 7 and the upcoming i.MX 8 (recently announced to be in the Toradex Apalis family). Looks to me like something that happened in the past when the ADC (Analog Digital Converter) started to be integrated as peripheral functions on the microcontrollers, having the microcontroller core in an application processor, is solving several issues related to real-time control on Linux-based solutions.
Today, Toradex has two established System on Modules (SoMs)/Computer on Modules (CoMs) based on the Multicore Heterogeneous architecture, namely the Colibri iMX7 and the Colibri VF61. Two more modules will be released soon, the Colibri iMX6ULL and the Apalis iMX8 thereby ensuring the scalability of customers across its pin-compatible families.
The introduction of a new technology always raises a lot of questions and you might be asking yourself whether there would be a lot of implementation. The purpose of this article is to show a quick and clear starting path to the development of an application with the heterogeneous multicore approach. Here we will cover the basic procedure to set up the environment and start the development, creating a ping pong application showing how to establish communication between cores and finally, show in the last example a practical use case where the microcontroller core reads an ADC data over SPI and send the information to the microprocessor core running the Linux operating system.
This is a series of articles aiming to demystify the development of embedded systems using Heterogeneous Multicore Processing architecture powered SoCs. Through a practical approach and presentation of several demos, this will provide you a quick start to your development.
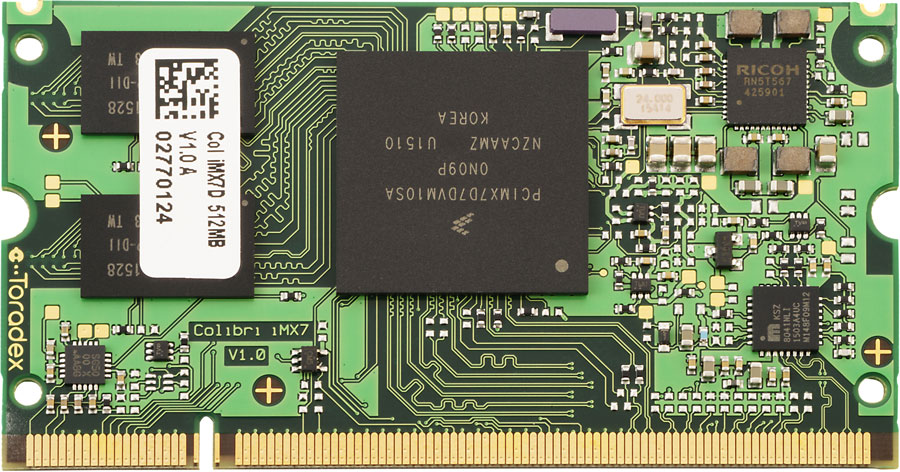
For this article, the Toradex dual core Colibri iMX7 System on Module was selected: this module is equipped with a NXP i.MX7 SoC, a dual-core Arm Cortex-A7 core plus an Arm Cortex-M4 core, with CPU clock of 1GHz for the A7 and 200MHz for the M4, plus 512MB of flash memory and 512MB of RAM. The module is presented in the image below:

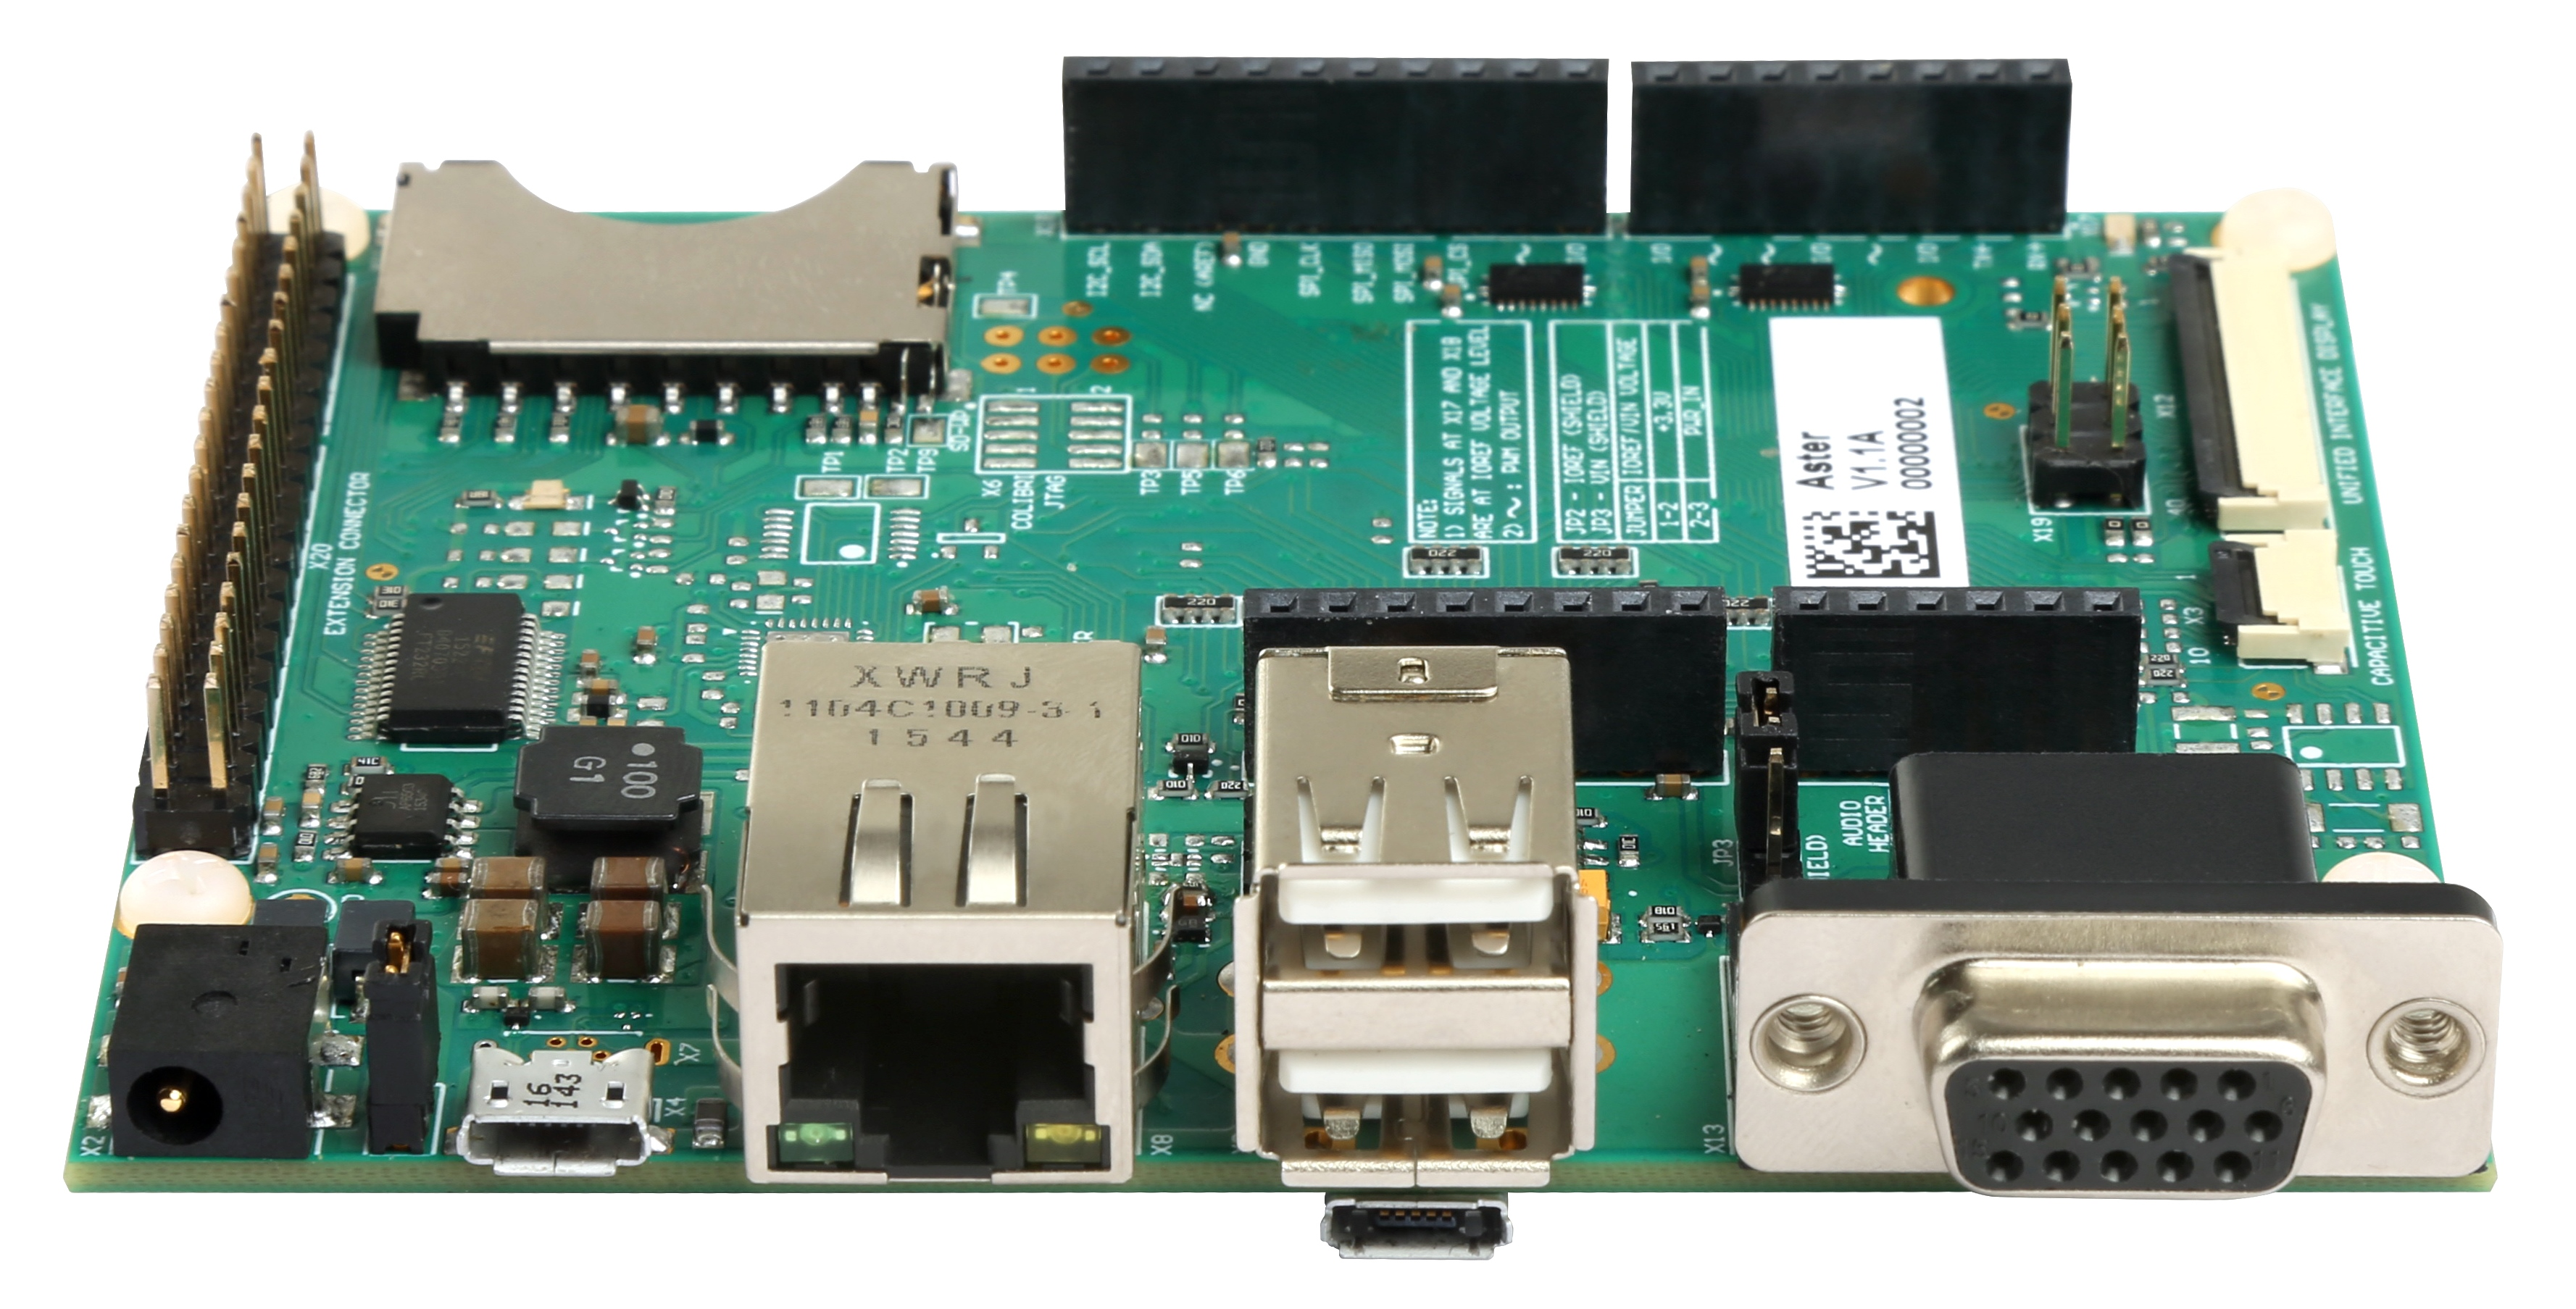
The Aster has been chosen as the carrier board. It is a new release from Toradex that makes life easier for those who are developing a new project. This carrier board has the standard Arduino shields connector, allowing developers to use the various Arduino shields prototyping modules available off-the-shelf in the market to reduce their design time.
In addition to the Arduino shield, a connector with the same Raspberry Pi pinout is also available, allowing the use of modules developed for this hardware, facilitating not only the prototyping of new designs, but also the transition from proofs-of-concept to scalable and industrial quality and life-time guaranteed hardware like Toradex.
The examples presented in this article were developed on a Linux host machine. All the code for Cortex-M is based on Makefile and Cmake. To compile the examples, just install a few packages and correctly configure the toolchain.
We recommend the linaro toolchain version 4.9 2015 Q3. After downloading the tar package from the link here, extract it as below:
tar xjf ~/Downloads/gcc-arm-none-eabi-4_9-2015q3-20150921-linux.tar.bz2
Since the toolchain generates 32-bit binaries, install the 32-bit version of libc and libncurse. For Ubuntu, the commands are:
sudo dpkg --add-architecture i386
sudo apt-get update
sudo apt-get install libc6:i386 libncurses5:i386
Now it is time to test the toolchain:
~/gcc-arm-none-eabi-4_9-2015q3/bin/arm-none-eabi-gcc --version
arm-none-eabi-gcc (GNU Tools for Arm Embedded Processors) 4.9.3 20150529 (release) [Arm/embedded-4_9-branch revision 227977]
Copyright (C) 2014 Free Software Foundation, Inc.
This is free software; see the source for copying conditions.  There is NO
warranty; not even for MERCHANTABILITY or FITNESS FOR A PARTICULAR PURPOSE.
Finally, install cmake and make:
sudo apt-get install make cmake
We prepared a couple of examples to be downloaded and easily tested, they include basic "Hello, World!" to inter-core communications. Start downloading the source code repository:
$ git clone -b colibri-imx7-m4-freertos-v8 git://git.toradex.com/freertos-toradex.git freertos-colibri-imx7/
$ cd freertos-colibri-imx7/
All the source codes that we will use as reference are in this folder. The folder structure is already done to support the Colibri iMX7 and also the FreeRTOS. Inside this structure the folder that we will most use is the folder containing all the examples:
[raul@localhost freertos-colibri-imx7]$ tree -L 2 examples/imx7_colibri_m4/
examples/imx7_colibri_m4/
├── board.c
├── board.h
├── clock_freq.c
├── clock_freq.h
├── demo_apps
│   ├── blinking_imx_demo
│   ├── hello_world
│   ├── hello_world_ddr
│   ├── hello_world_ocram
│   ├── low_power_imx7d
│   ├── rpmsg
│   └── sema4_demo
├── driver_examples
│   ├── adc_imx7d
│   ├── ecspi
│   ├── flexcan
│   ├── gpio_imx
│   ├── gpt
│   ├── i2c_imx
│   ├── uart_imx
│   └── wdog_imx
├── gpio_pins.c
├── gpio_pins.h
├── pin_mux.c
└── pin_mux.h

17 directories, 8 files
[raul@localhost freertos-colibri-imx7]$
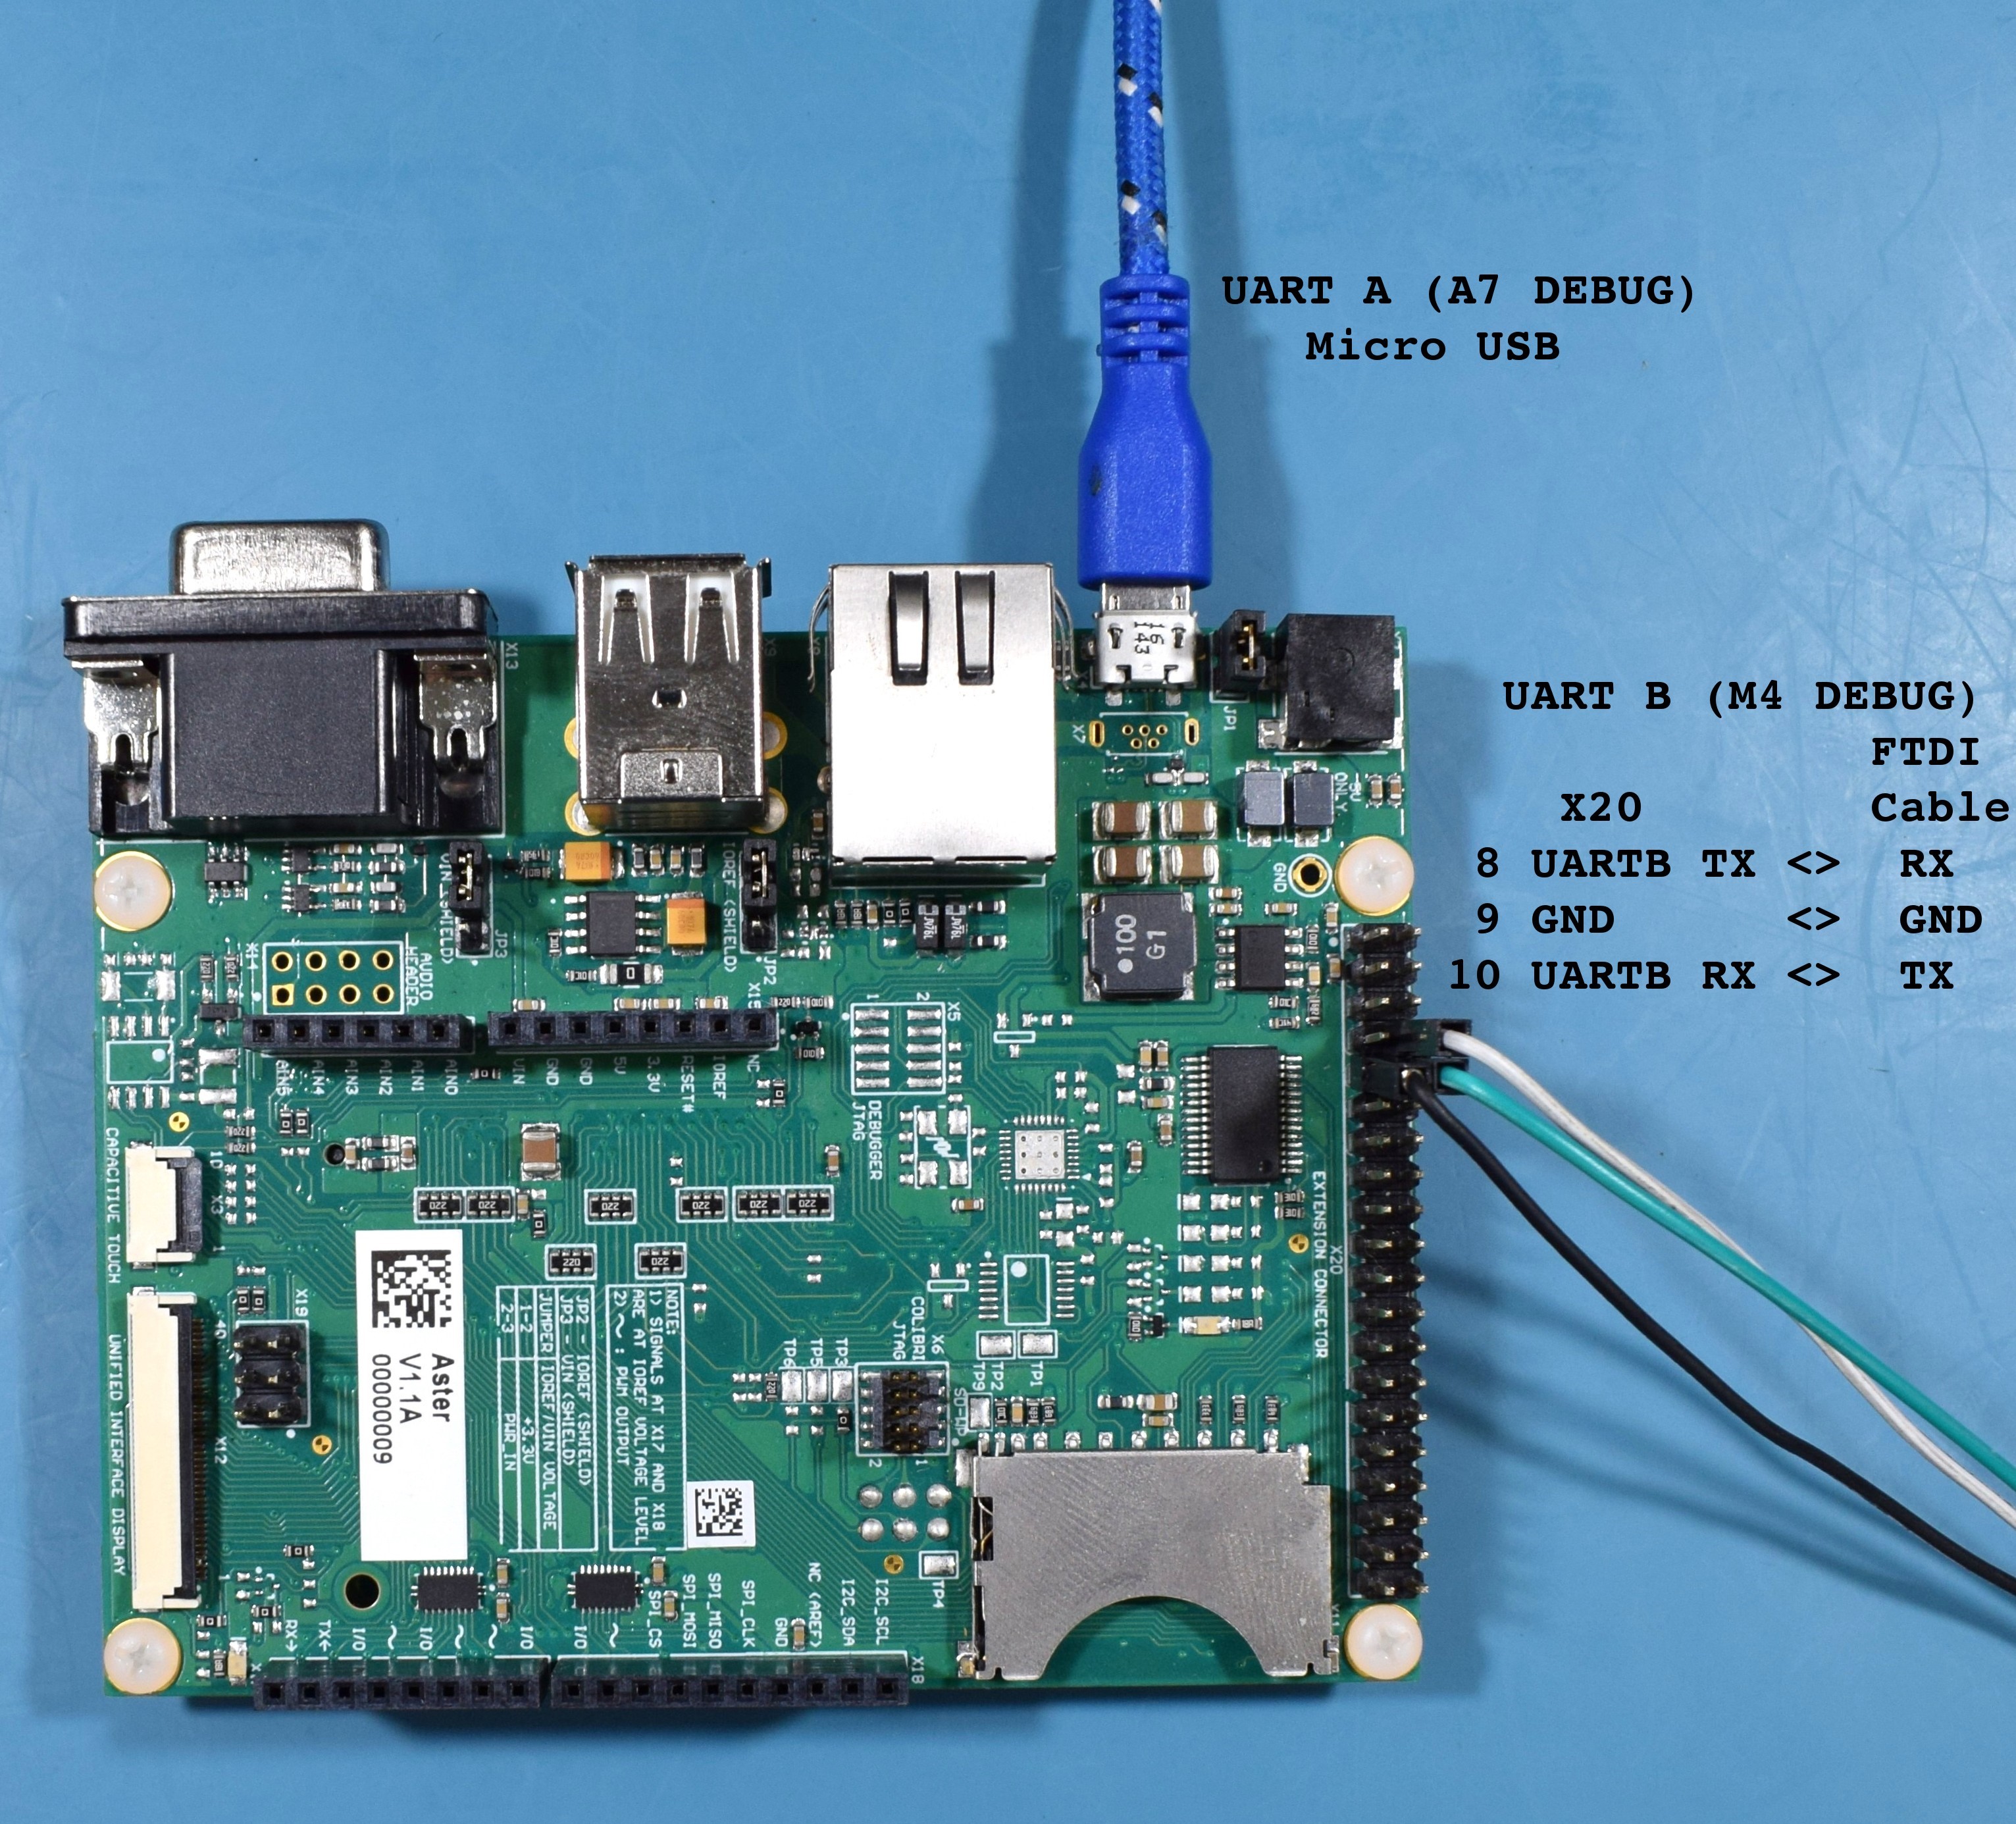
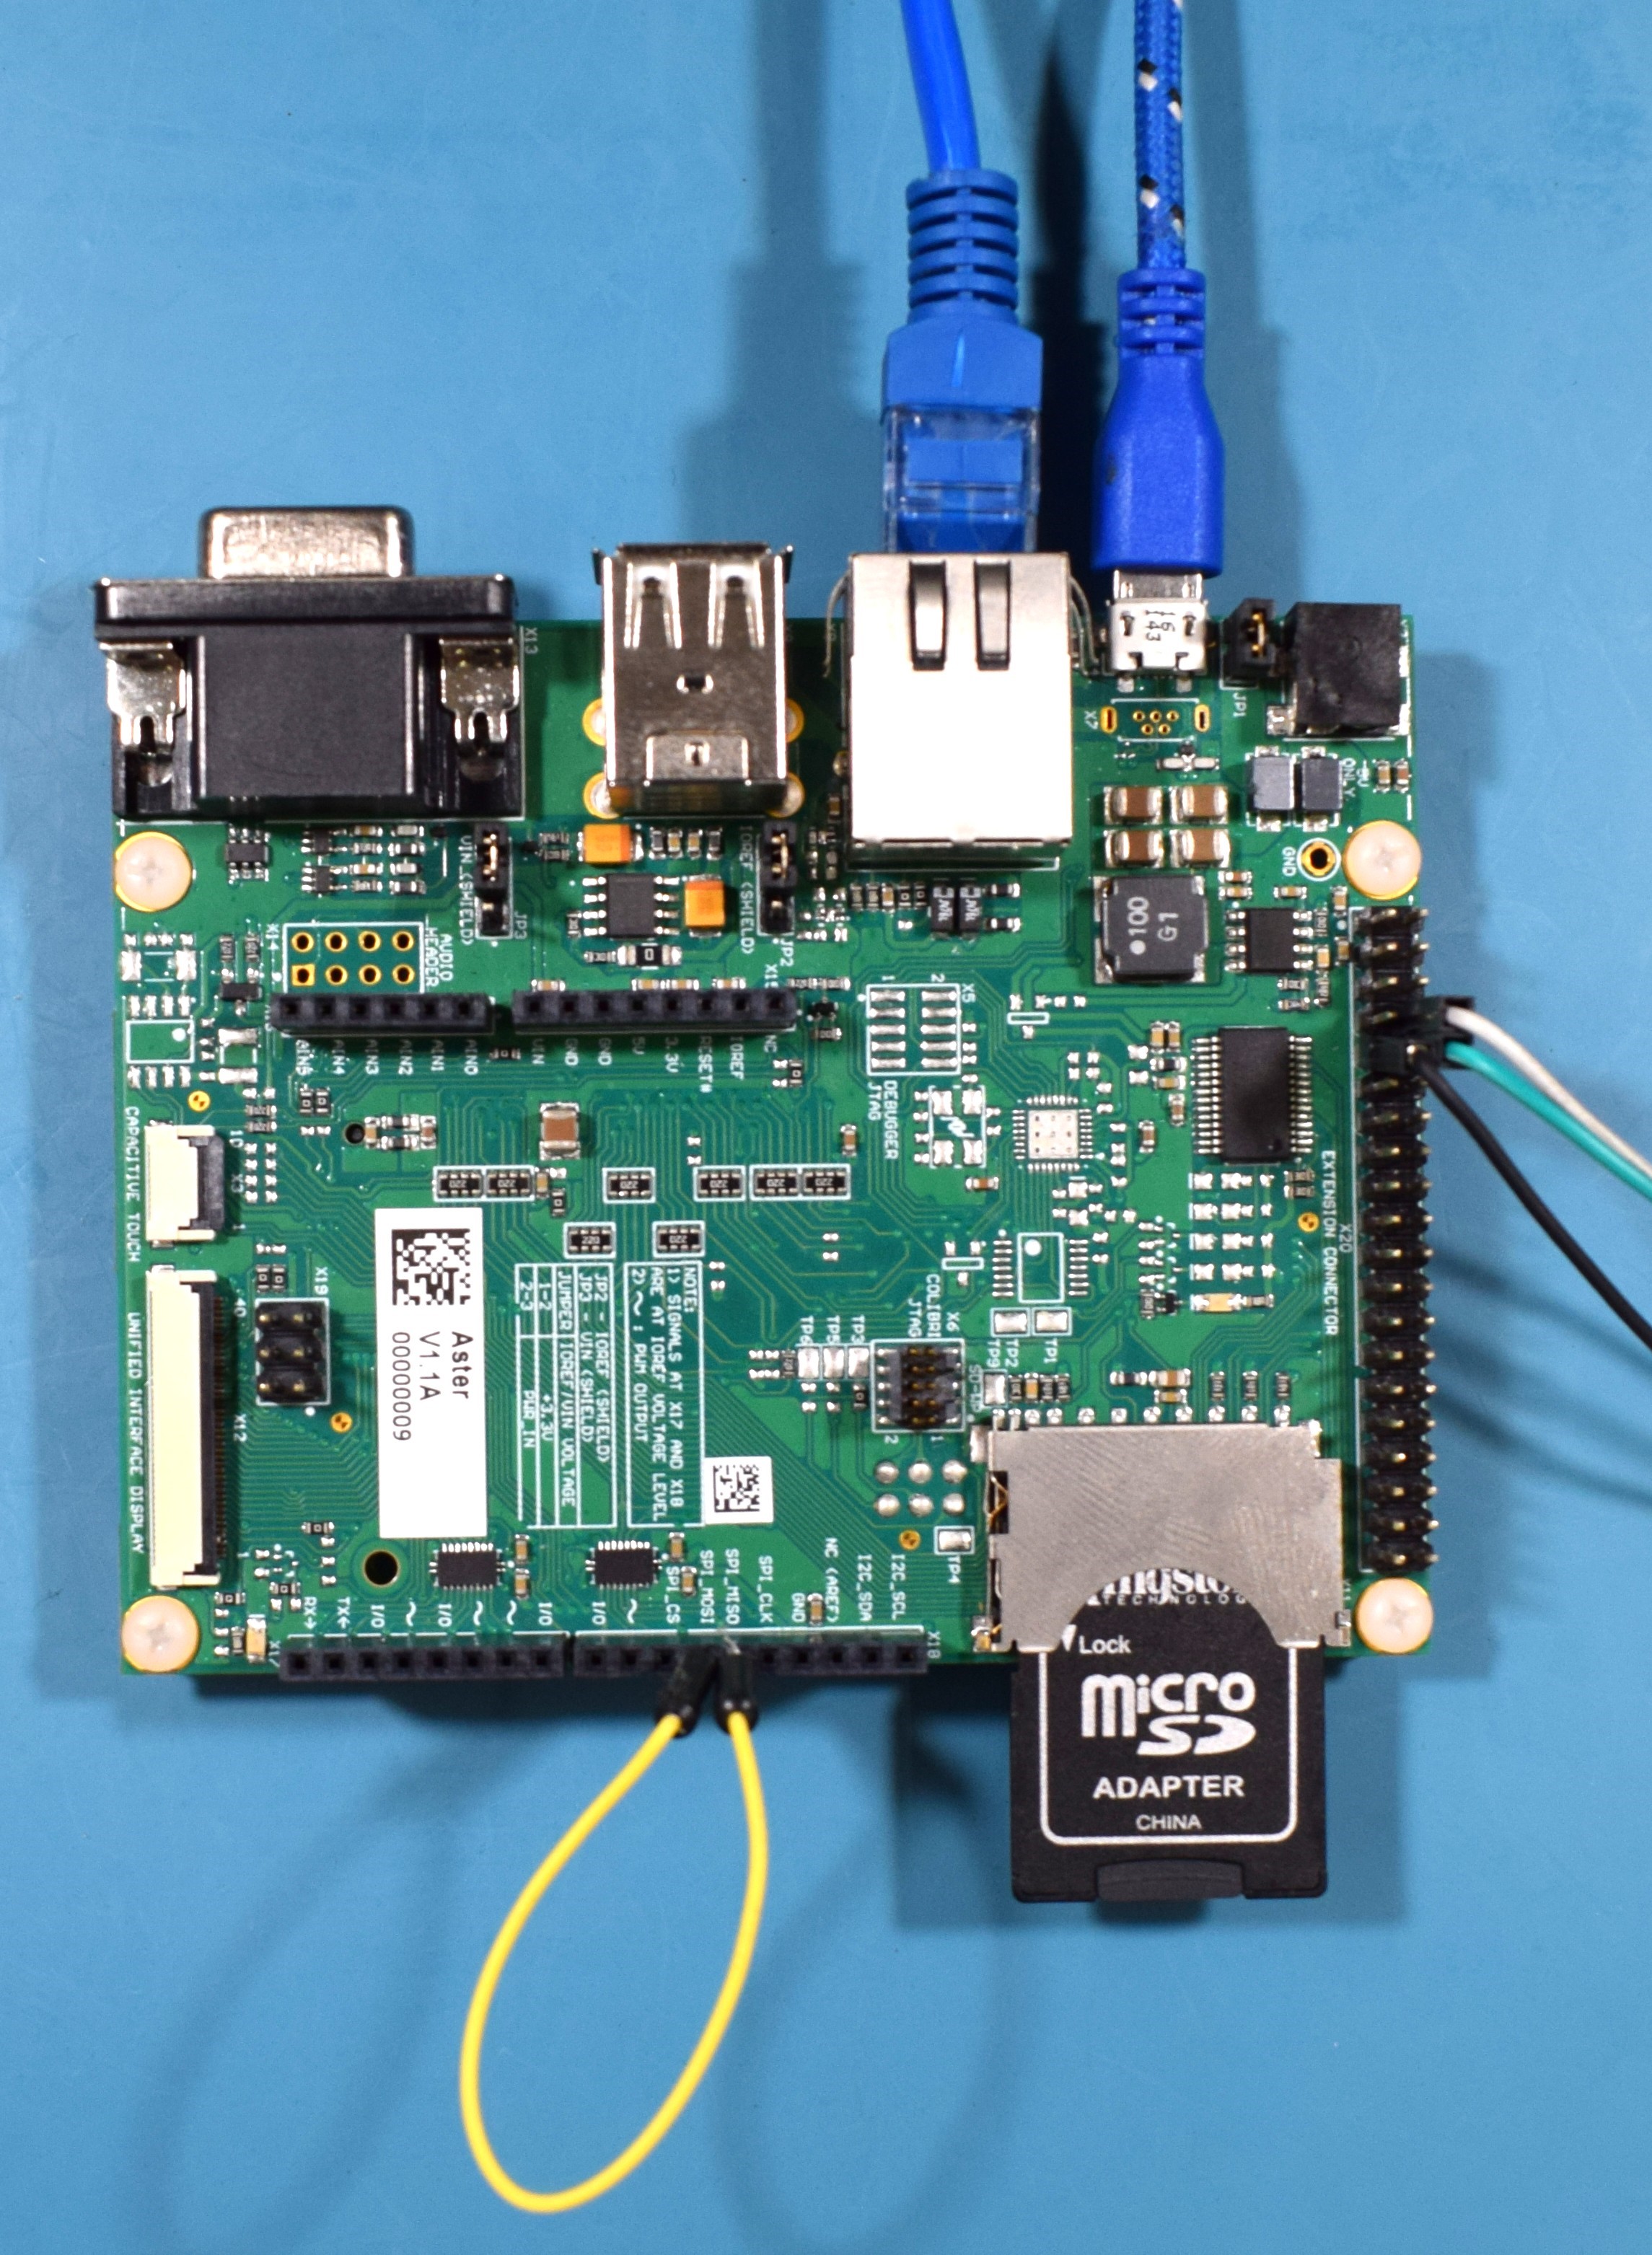
In this article, we are not covering how to debug on Cortex-M, so we will use a UART to get the messages printed by the firmware. It is very important to understand how to set up the environment to get a productive development set. Since the Cortex-M and the Cortex-A cores share interfaces, it is necessary to know that the messages printed on the UART B will be printed by the Cortex-M firmware and the messages in the UART A will be printed by Cortex-A (U-boot and Linux).

Therefore, we will use two different cables for UART A and UART B. In the case of UART A, it already has an FTDI chip on the Aster carrier board, and the connection is made by connecting it to the USB X4 connector. This connector is being used to power on the board as well as access the UART A, so when connecting it to the computer the device /dev/ttyUSBX should be recognized automatically.
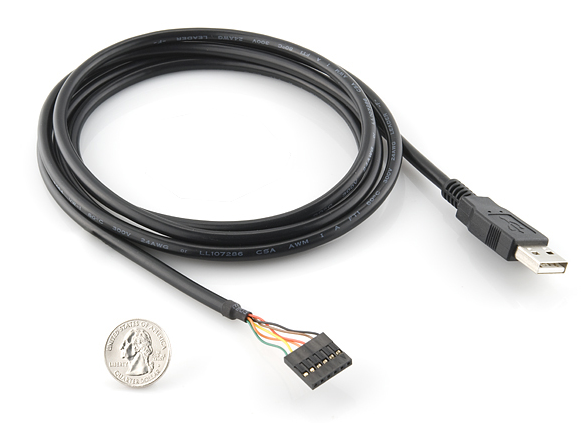
For UART B, the TX and RX pins of the Colibri iMX7 are connected in the X20 expansion header. Since there is no FTDI chip or Serial RS-232 converter for this interface, you need to use a cable popularly known as the FTDI cable. Connect the RX, TX, and ground pins of the FTDI cable to the connector X20 pins 8, 10, and 9 respectively.
Finally, the cables must to be connected like the picture below:
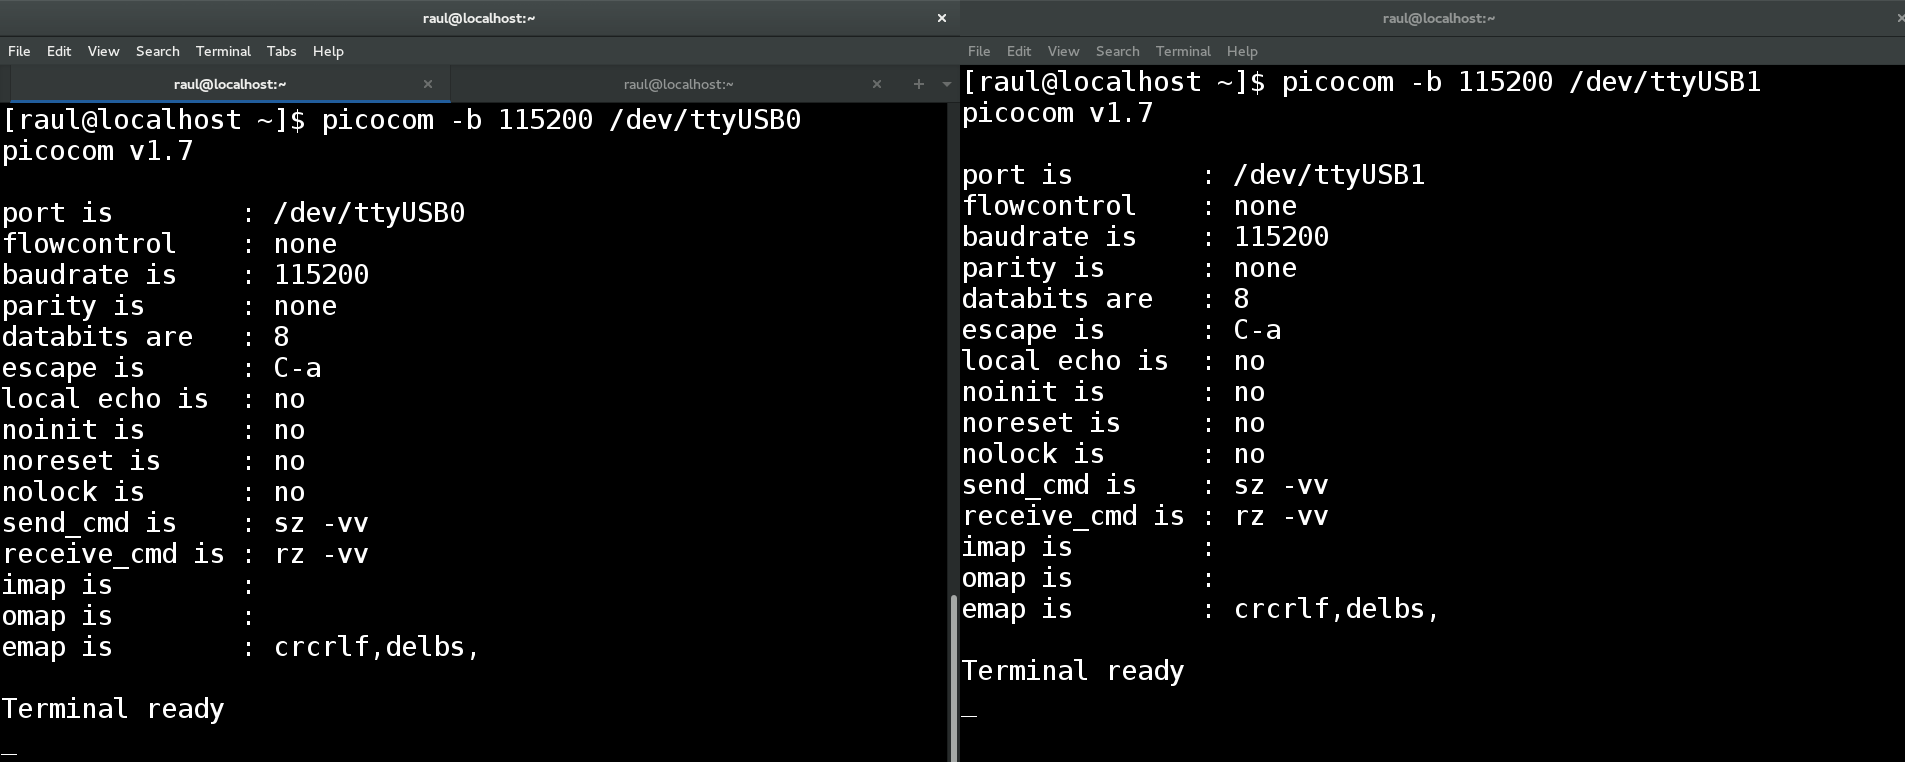
Now that the cables are properly connected, open two terminals on Linux with “picocom” and open the serial ports:
Terminal 1:
[raul@localhost ~]$ picocom -b 115200 /dev/ttyUSB0
Terminal 2:
[raul@localhost ~]$ picocom -b 115200 /dev/ttyUSB1
You may have something like the following image:
To compile the first example, go to SPI example directory:
[raul@localhost freertos-colibri-imx7]$ cd examples/imx7_colibri_m4/driver_examples/ecspi/ecspi_interrupt/master/
[raul@localhost master]$ ls
armgcc  hardware_init.c  main.c
Note that all of the examples have the files main.c, hardware_init.c and the folder armgcc. We will not explain the source code now, just go to the directory, export the toolchain path that we downloaded and compile the example:
[raul@localhost armgcc]$ cd ..
[raul@localhost master]$ cd armgcc/
[raul@localhost armgcc]$ export ArmGCC_DIR=~/gcc-arm-none-eabi-4_9-2015q3/
[raul@localhost armgcc]$ ./build_all.sh
-- TOOLCHAIN_DIR: /home/raul/gcc-arm-none-eabi-4_9-2015q3/
-- BUILD_TYPE: Debug
-- TOOLCHAIN_DIR: /home/raul/gcc-arm-none-eabi-4_9-2015q3/
-- BUILD_TYPE: Debug
-- Could not determine Eclipse version, assuming at least 3.6 (Helios). Adjust CMAKE_ECLIPSE_VERSION if this is wrong.
-- The ASM compiler identification is GNU
-- Found assembler: /home/raul/gcc-arm-none-eabi-4_9-2015q3//bin/arm-none-eabi-gcc
-- Configuring done
-- Generating done
-- Build files have been written to: /home/raul/freertos-colibri-imx7/examples/imx7_colibri_m4/driver_examples/ecspi/ecspi_interrupt/master/armgcc
Scanning dependencies of target ecspi_interrupt_master_example
[  5%] Building C object CMakeFiles/ecspi_interrupt_master_example.dir/home/raul/freertos-colibri-imx7/platform/utilities/src/debug_console_imx.c.obj
...
...
...
[ 94%] Building C object CMakeFiles/ecspi_interrupt_master_example.dir/home/raul/freertos-colibri-imx7/platform/drivers/src/uart_imx.c.obj
[100%] Linking C executable debug/ecspi_interrupt_master_example.elf
[100%] Built target ecspi_interrupt_master_example
-- TOOLCHAIN_DIR: /home/raul/gcc-arm-none-eabi-4_9-2015q3/
-- BUILD_TYPE: Release
-- Eclipse version is set to 3.6 (Helios). Adjust CMAKE_ECLIPSE_VERSION if this is wrong.
-- Configuring done
-- Generating done
CMake Warning:
  Manually-specified variables were not used by the project:

    CMAKE_TOOLCHAIN_FILE


-- Build files have been written to: /home/raul/freertos-colibri-imx7/examples/imx7_colibri_m4/driver_examples/ecspi/ecspi_interrupt/master/armgcc
[  5%] Building ASM object CMakeFiles/ecspi_interrupt_master_example.dir/home/raul/freertos-colibri-imx7/platform/devices/MCIMX7D/startup/gcc/startup_MCIMX7D_M4.S.obj
...
...
...
[ 94%] Building C object CMakeFiles/ecspi_interrupt_master_example.dir/home/raul/freertos-colibri-imx7/platform/drivers/src/uart_imx.c.obj
[100%] Linking C executable release/ecspi_interrupt_master_example.elf
[100%] Built target ecspi_interrupt_master_example
[raul@localhost armgcc]$

	The binaries are located in the "release" directory.
[raul@localhost armgcc]$ cd release/
[raul@localhost release]$ ls
ecspi_interrupt_master_example.bin  ecspi_interrupt_master_example.hex
ecspi_interrupt_master_example.elf  ecspi_interrupt_master_example.map
[raul@localhost release]$
In our case, the file ".bin" is the most important. Let´s use U-boot to load it on the Cortex-M4.
To execute the firmware, it is necessary that U-boot load the binaries and run the file on the Cortex-M. It is possible to do this in different ways. My suggestion is to use a SD card (FAT32) or network. We will show the instructions to do it both ways. On one hand, keep in mind that while using the network the development occurs in a dynamic way, since it is not necessary to plug and to unplug the SD card in the board. On the other hand, to do the steps of loading by Ethernet, you need to configure a tftp server and in my case the configured folder is "/srv/tftp/". To configure tftp check the tutorial Flashing Linux Over Ethernet.
SD Card:
Copy the file to the SD Card and then place it on the board:
[raul@localhost release]$ df
Filesystem              1K-blocks      Used Available Use% Mounted on
/dev/sdb1                 7780496    469540   7310956   7% /run/media/raul/DATA
[raul@localhost release]$ cp ecspi_interrupt_master_example.bin /run/media/raul/DATA
[raul@localhost release]$ umount /run/media/raul/DATA
Ethernet:
Copy the file to the tftp server folder, plug a network cable on the board and set up a network that allows you to connect your computer to it. In my case, the board IP is 192.168.0.170 and my host computer 192.168.0.150.
[raul@localhost release]$ cp ecspi_interrupt_master_example.bin /srv/tftp/
Power on the board and on the terminal UART-A (U-boot and Linux) press any key as soon as you power it on. The idea is to stop U-boot in order to load and execute the binary.
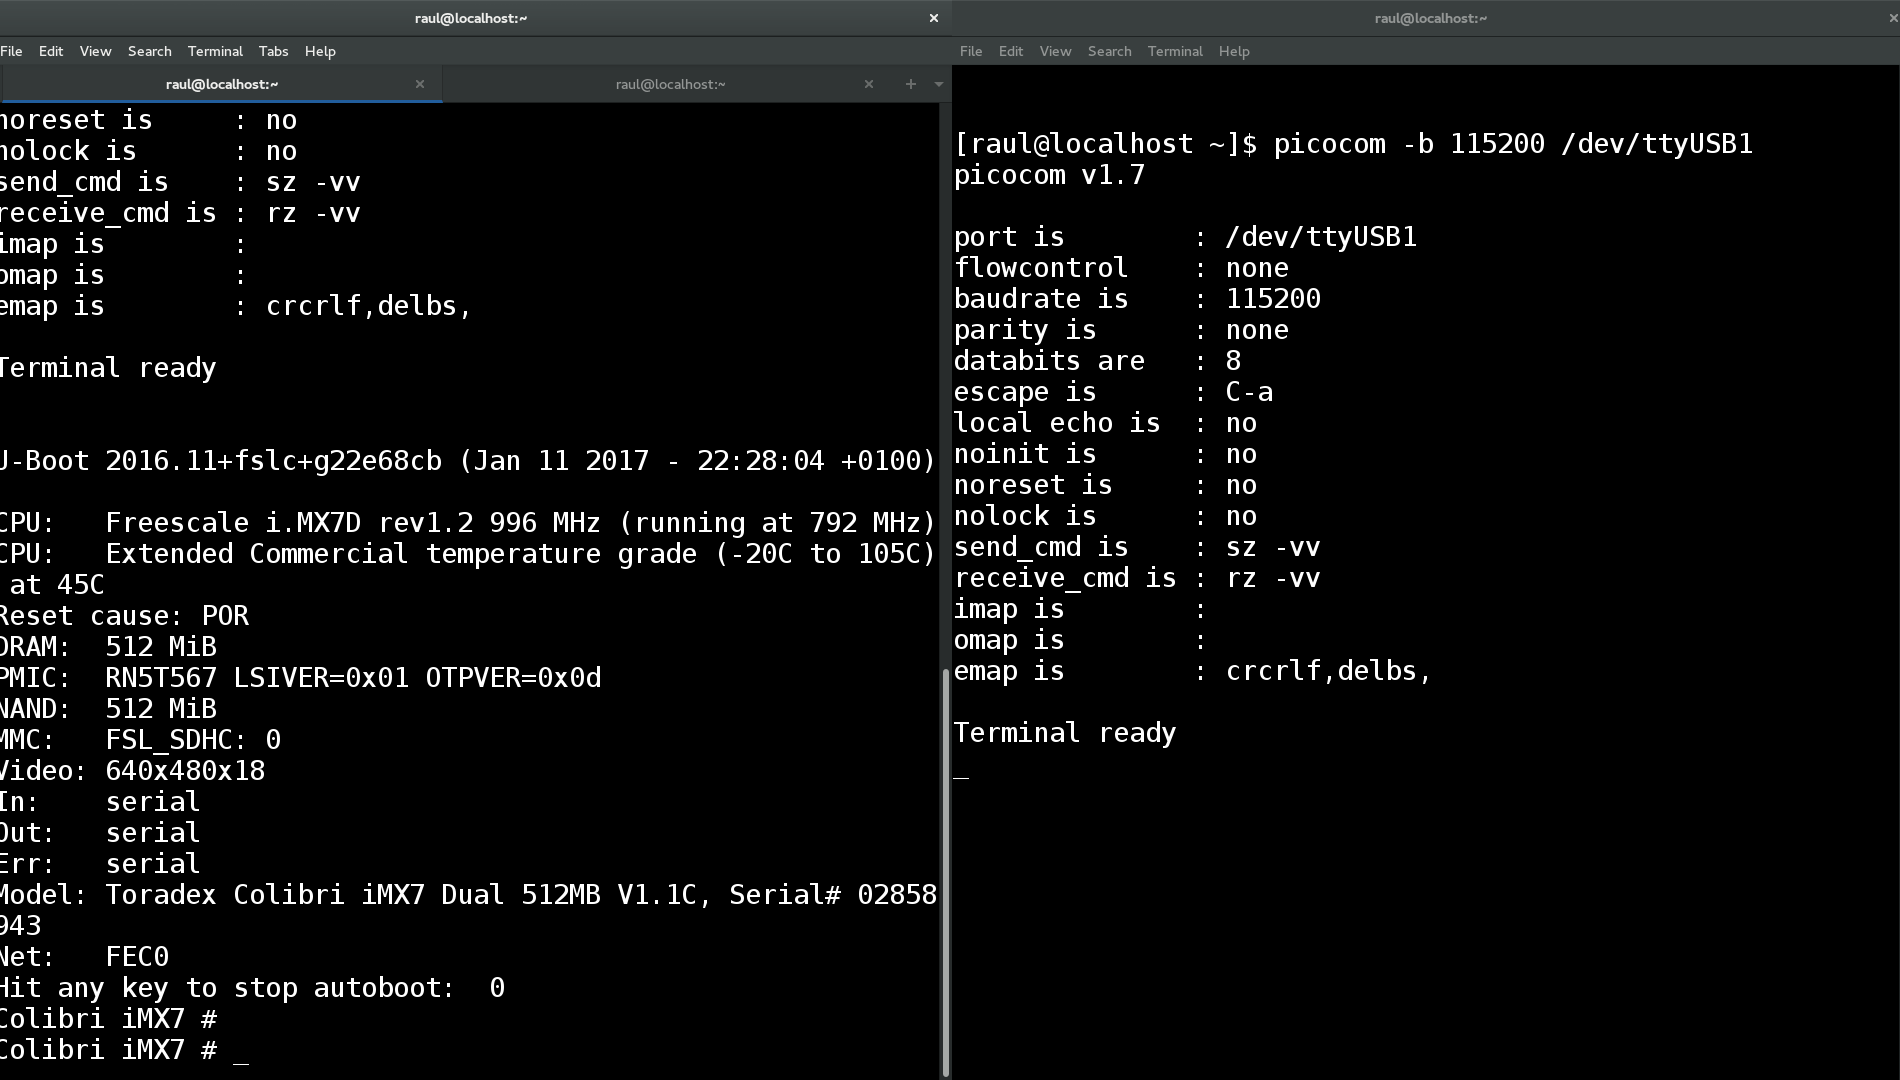
At the U-boot prompt, run the commands to load the binary:
SD Card:
Colibri iMX7 # fatload mmc 0:1 0x7F8000 ecspi_interrupt_master_example.bin
reading ecspi_interrupt_master_example.bin
9956 bytes read in 20 ms (485.4 KiB/s)
Ethernet:
Colibri iMX7 # tftp 0x7F8000 ecspi_interrupt_master_example.bin
Using FEC0 device
TFTP from server 192.168.0.150; our IP address is 192.168.0.170
Filename 'ecspi_interrupt_master_example.bin'.
Load address: 0x7f8000
Loading: ##################################################  9.7 KiB
	 647.5 KiB/s
done
Bytes transferred = 9956 (26e4 hex)
Once it is loaded, despite using SD Card or Ethernet, run the command to execute the binary that was loaded on the Cortex-M.
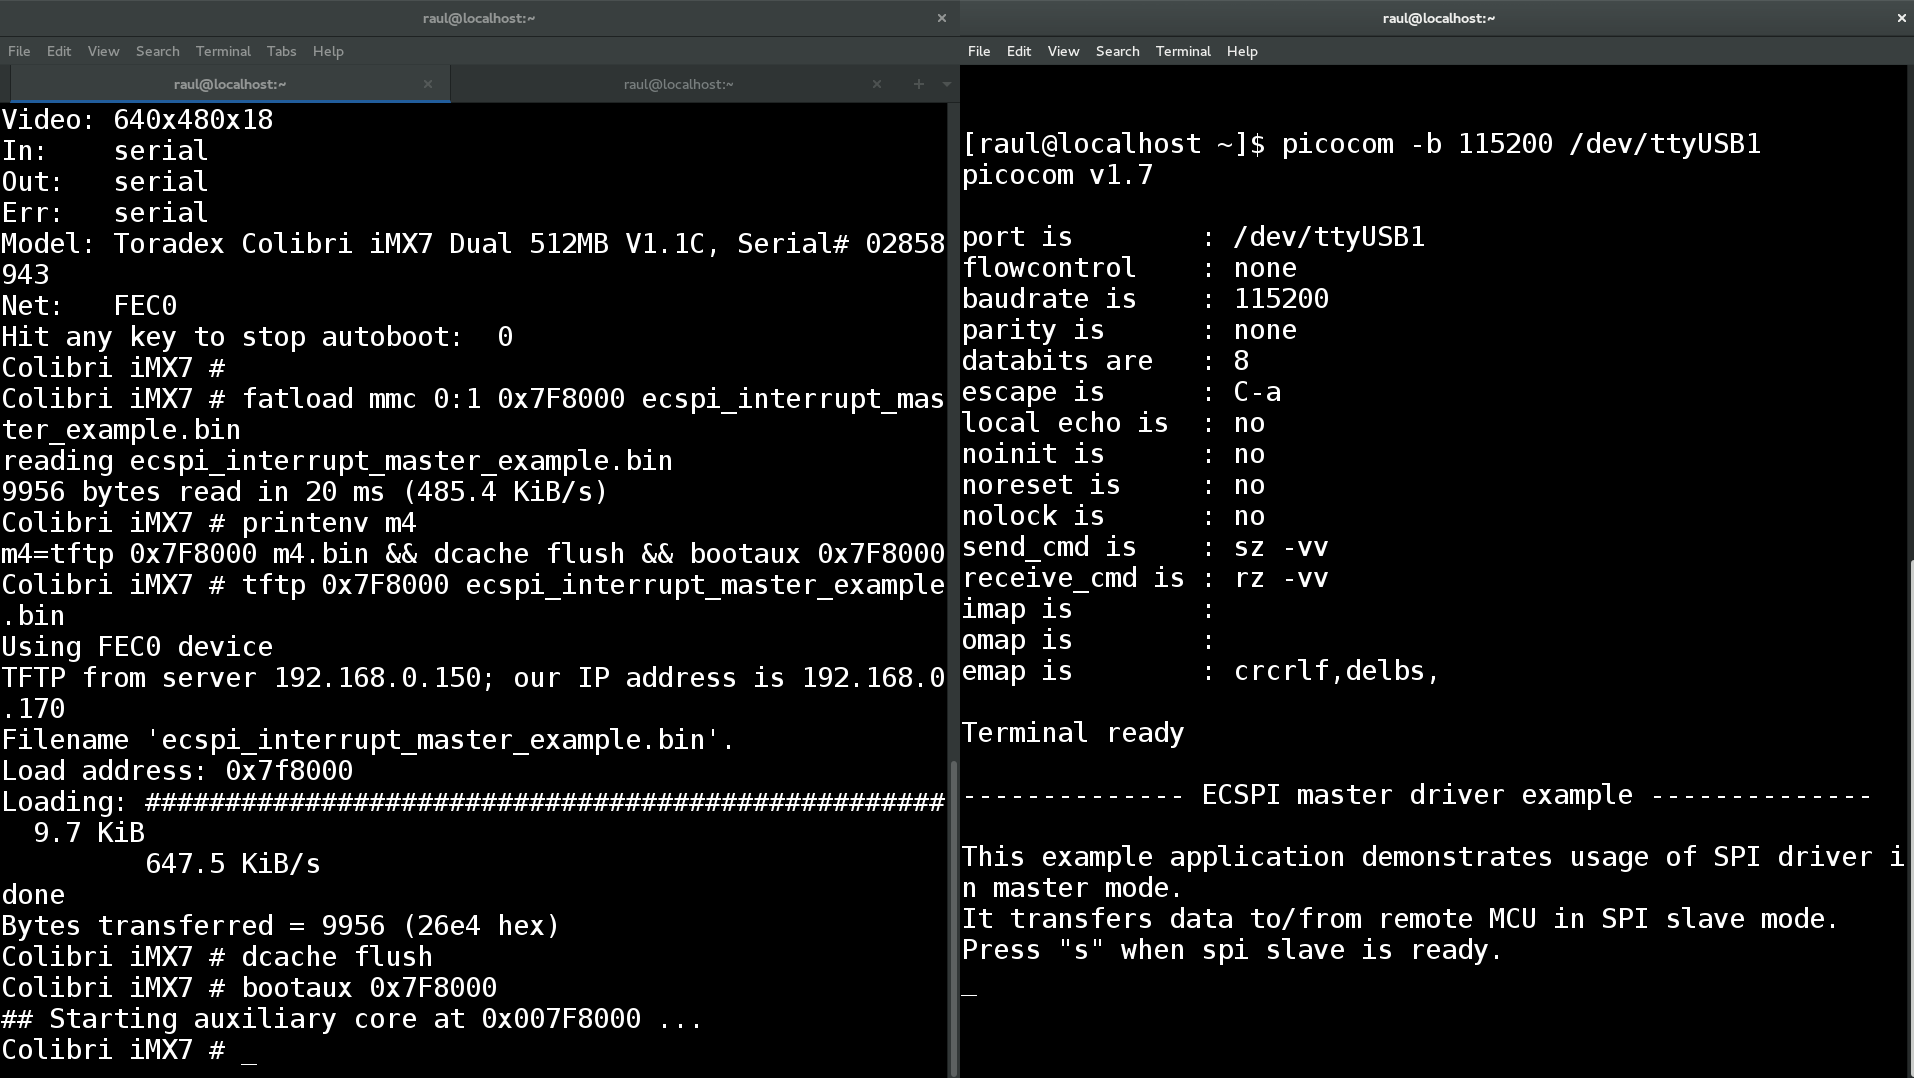
Colibri iMX7 # dcache flush
Colibri iMX7 # bootaux 0x7F8000
## Starting auxiliary core at 0x007F8000 ...
Colibri iMX7 #
Next, you should see the Cortex-M printing the debug messages on the UART B terminal. Your screen should look like the next image.
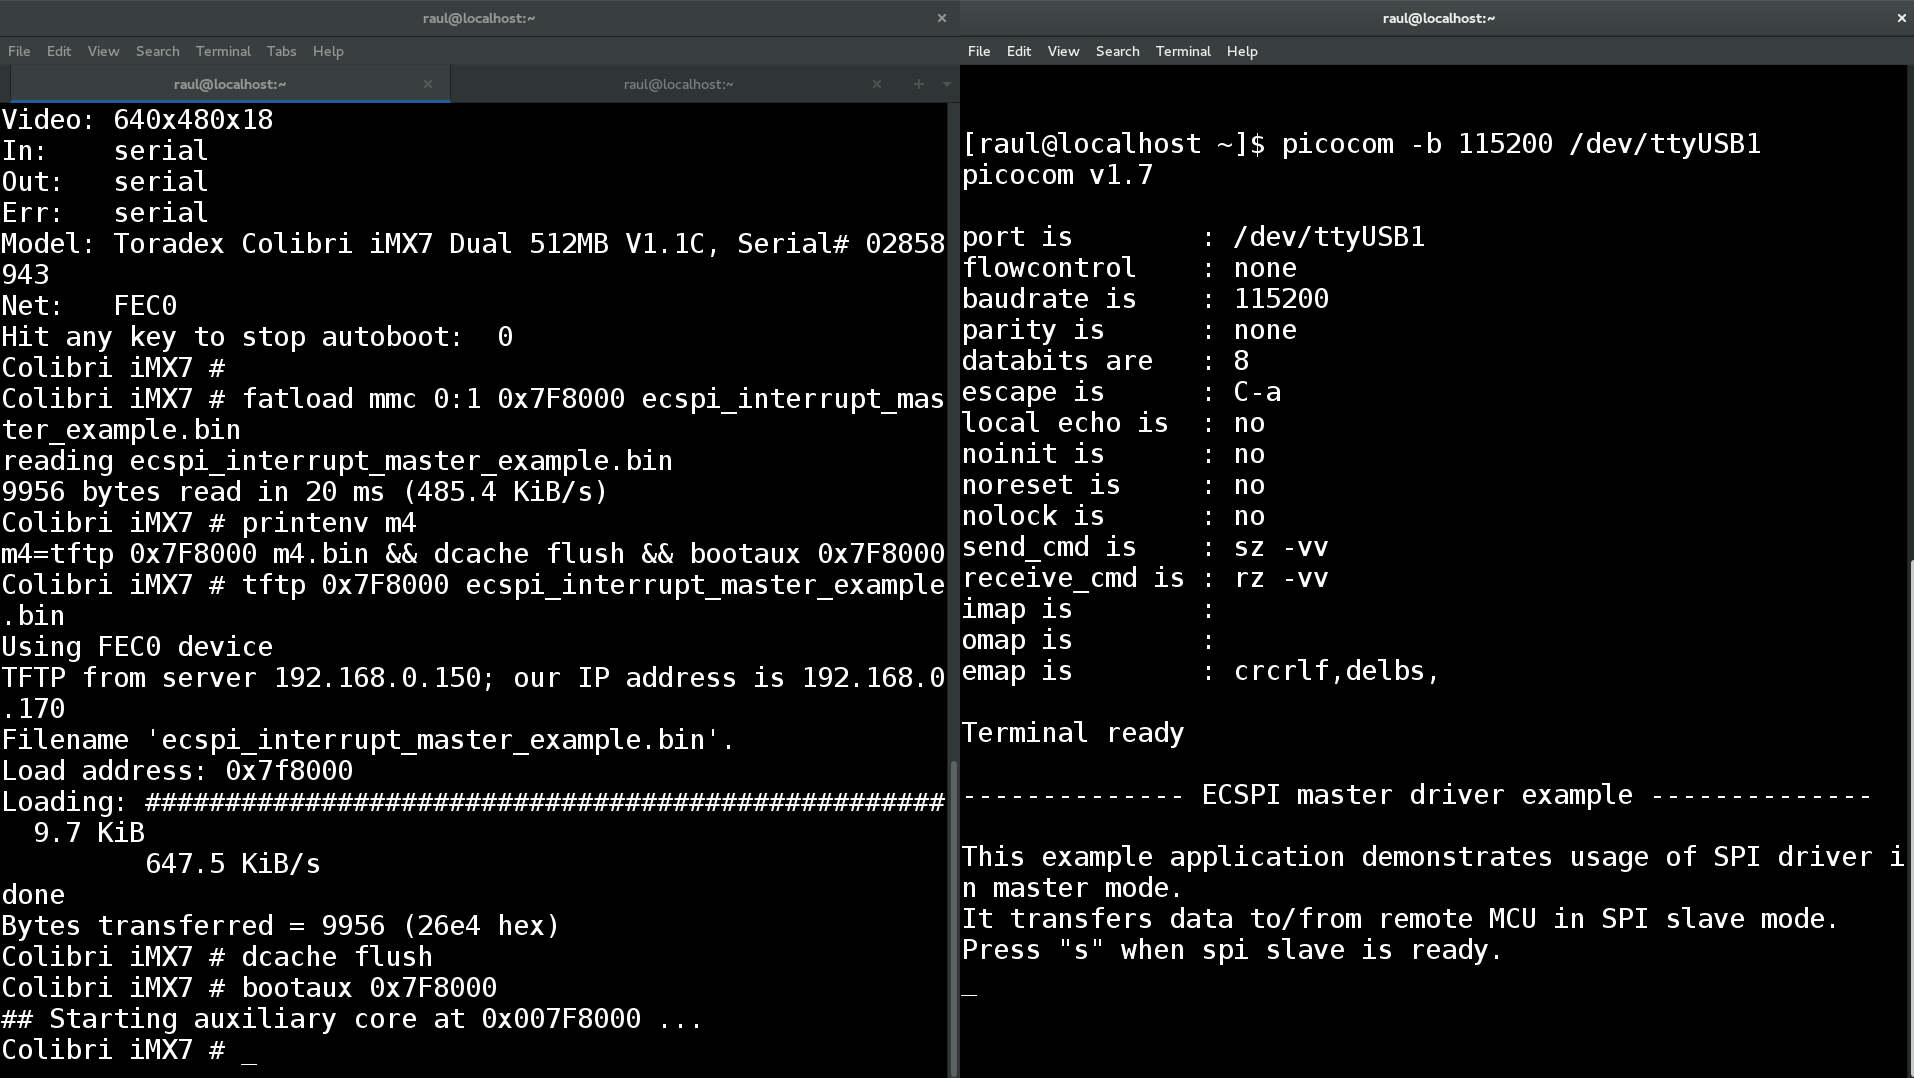
Before typing “s” in the UART B terminal, prepare a loop-back between SPI MISO and MOSI pins. Thus, it will be possible to see the communication in loop-back and not only send message but also receive data in the SPI.
-------------- ECSPI master driver example --------------

This example application demonstrates usage of SPI driver in master mode.
It transfers data to/from remote MCU in SPI slave mode.
Press "s" when spi slave is ready.
MASTER: Transmited data: 1
      : Received data: 1
MASTER: Transmited data: 2
      : Received data: 2
...
...
...
MASTER: Transmited data: 19
      : Received data: 19
MASTER: Transmited data: 20
      : Received data: 20
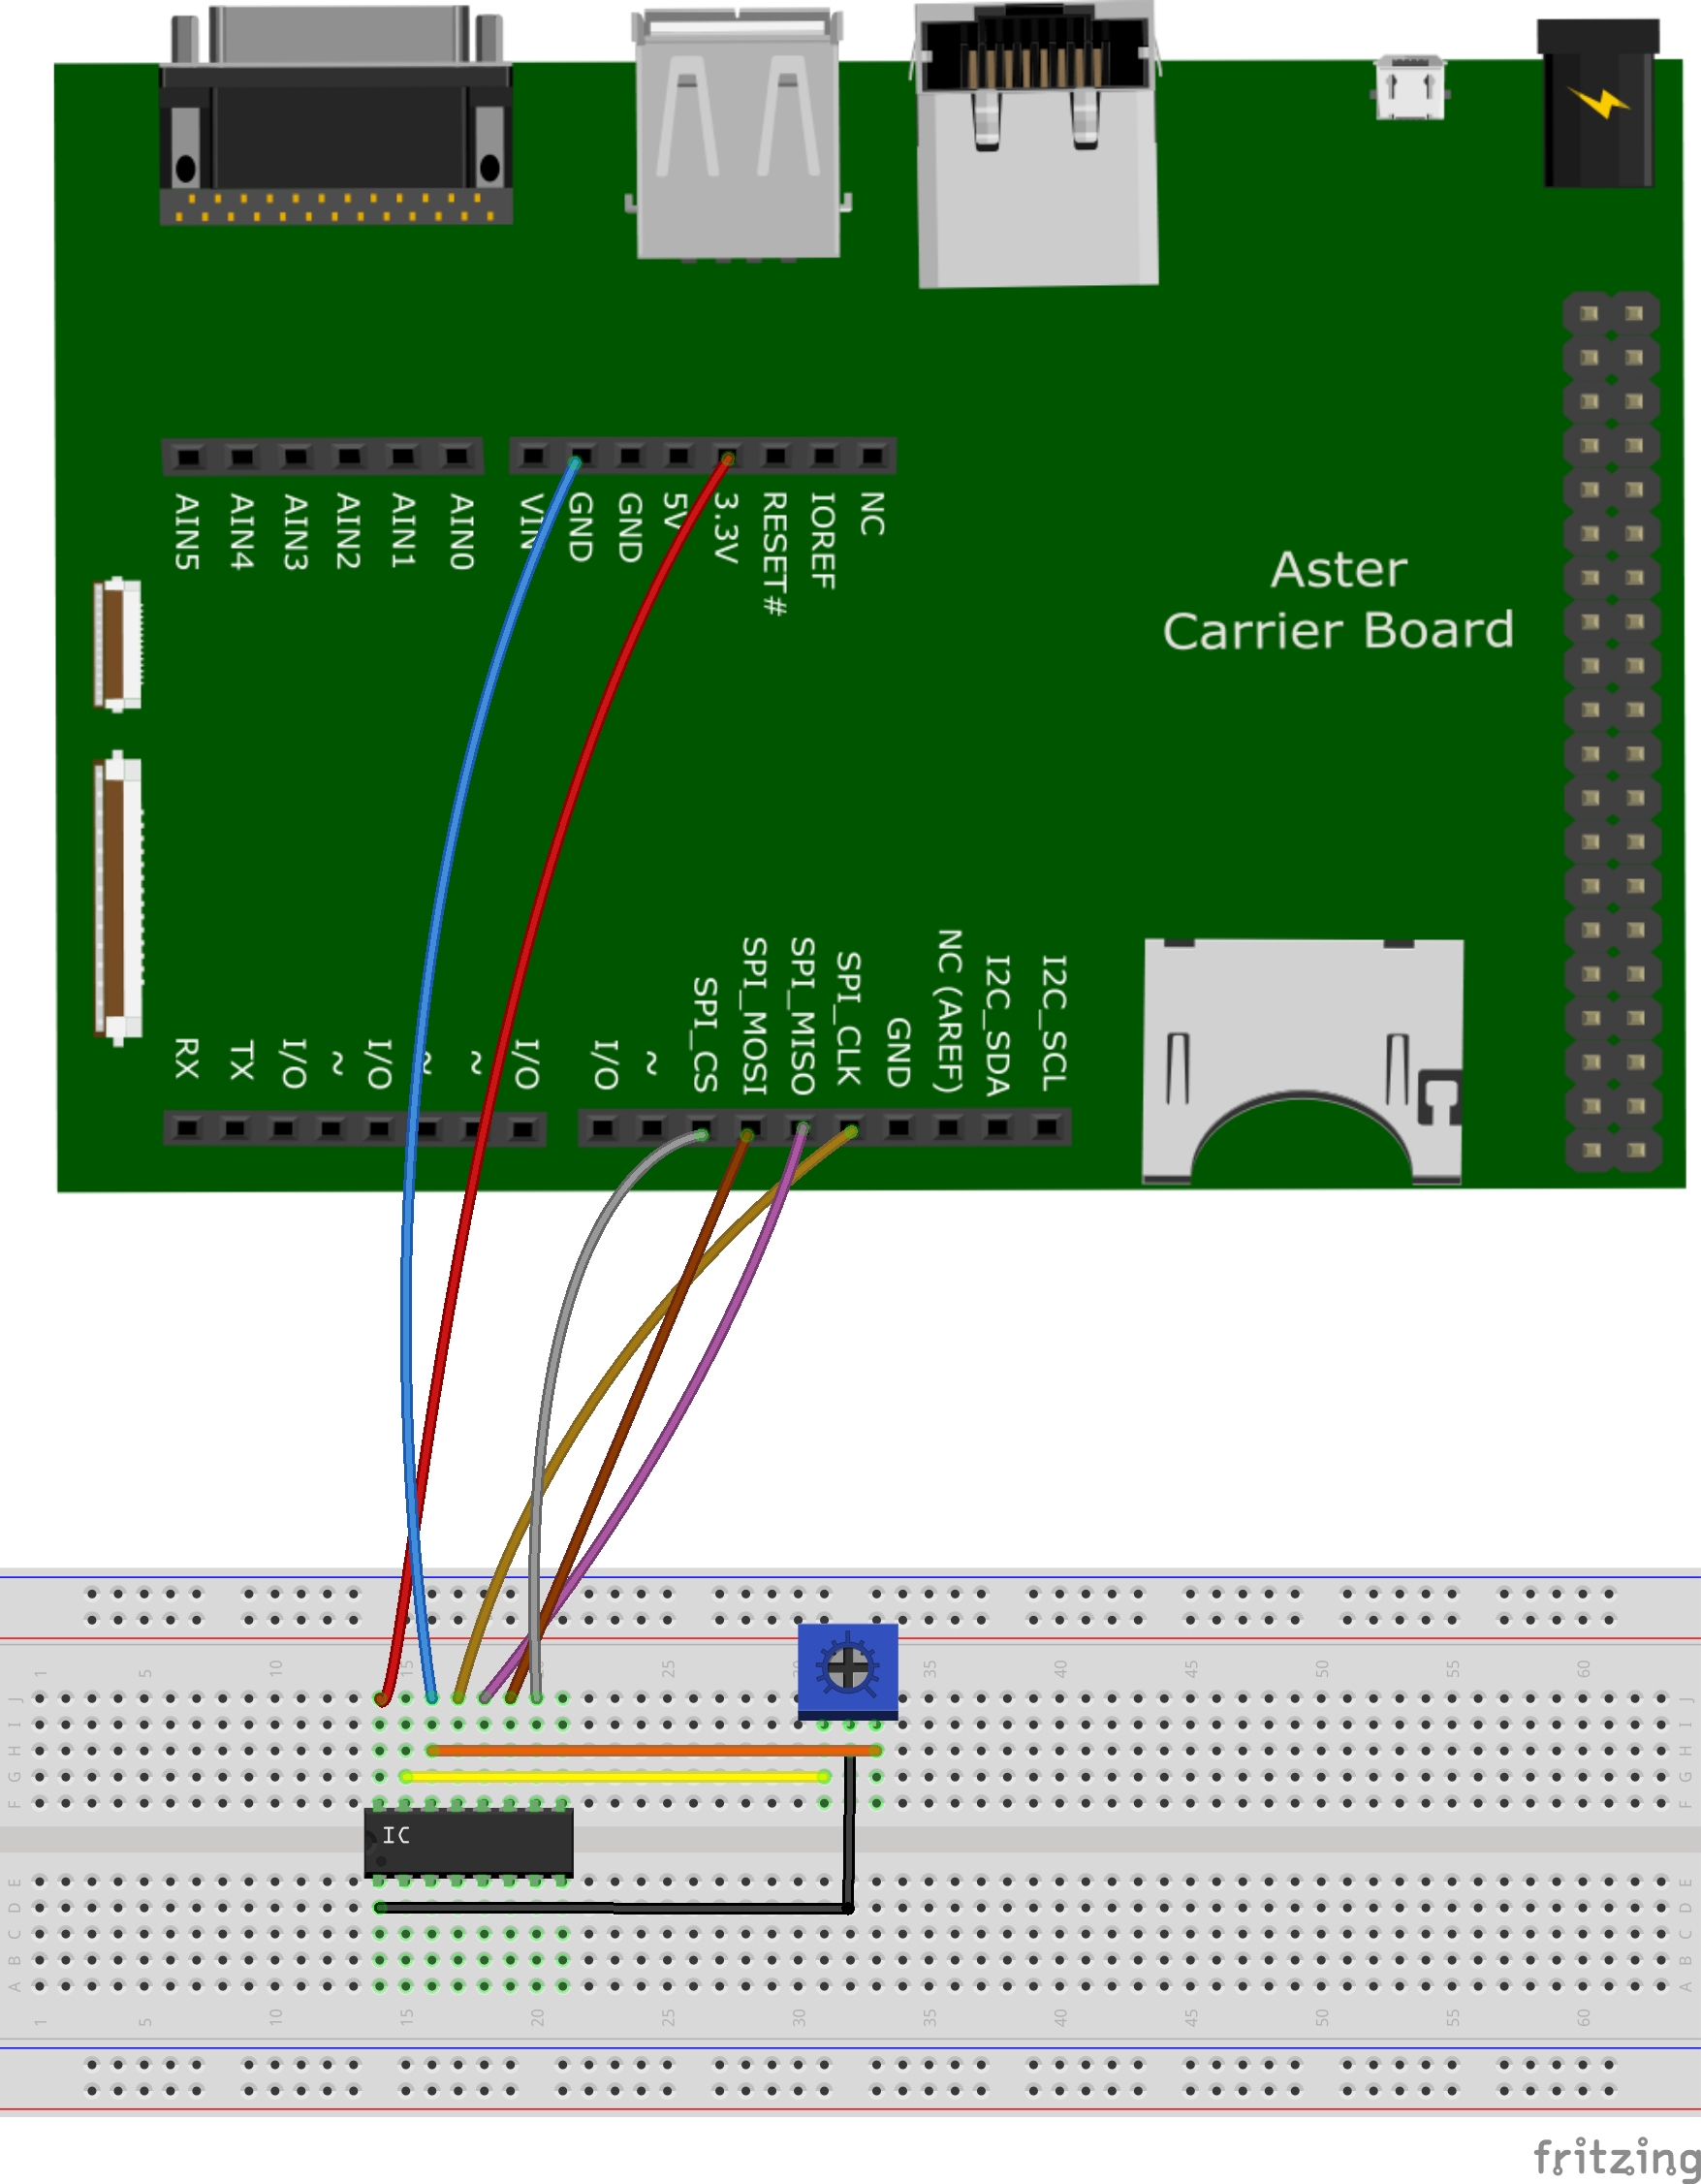
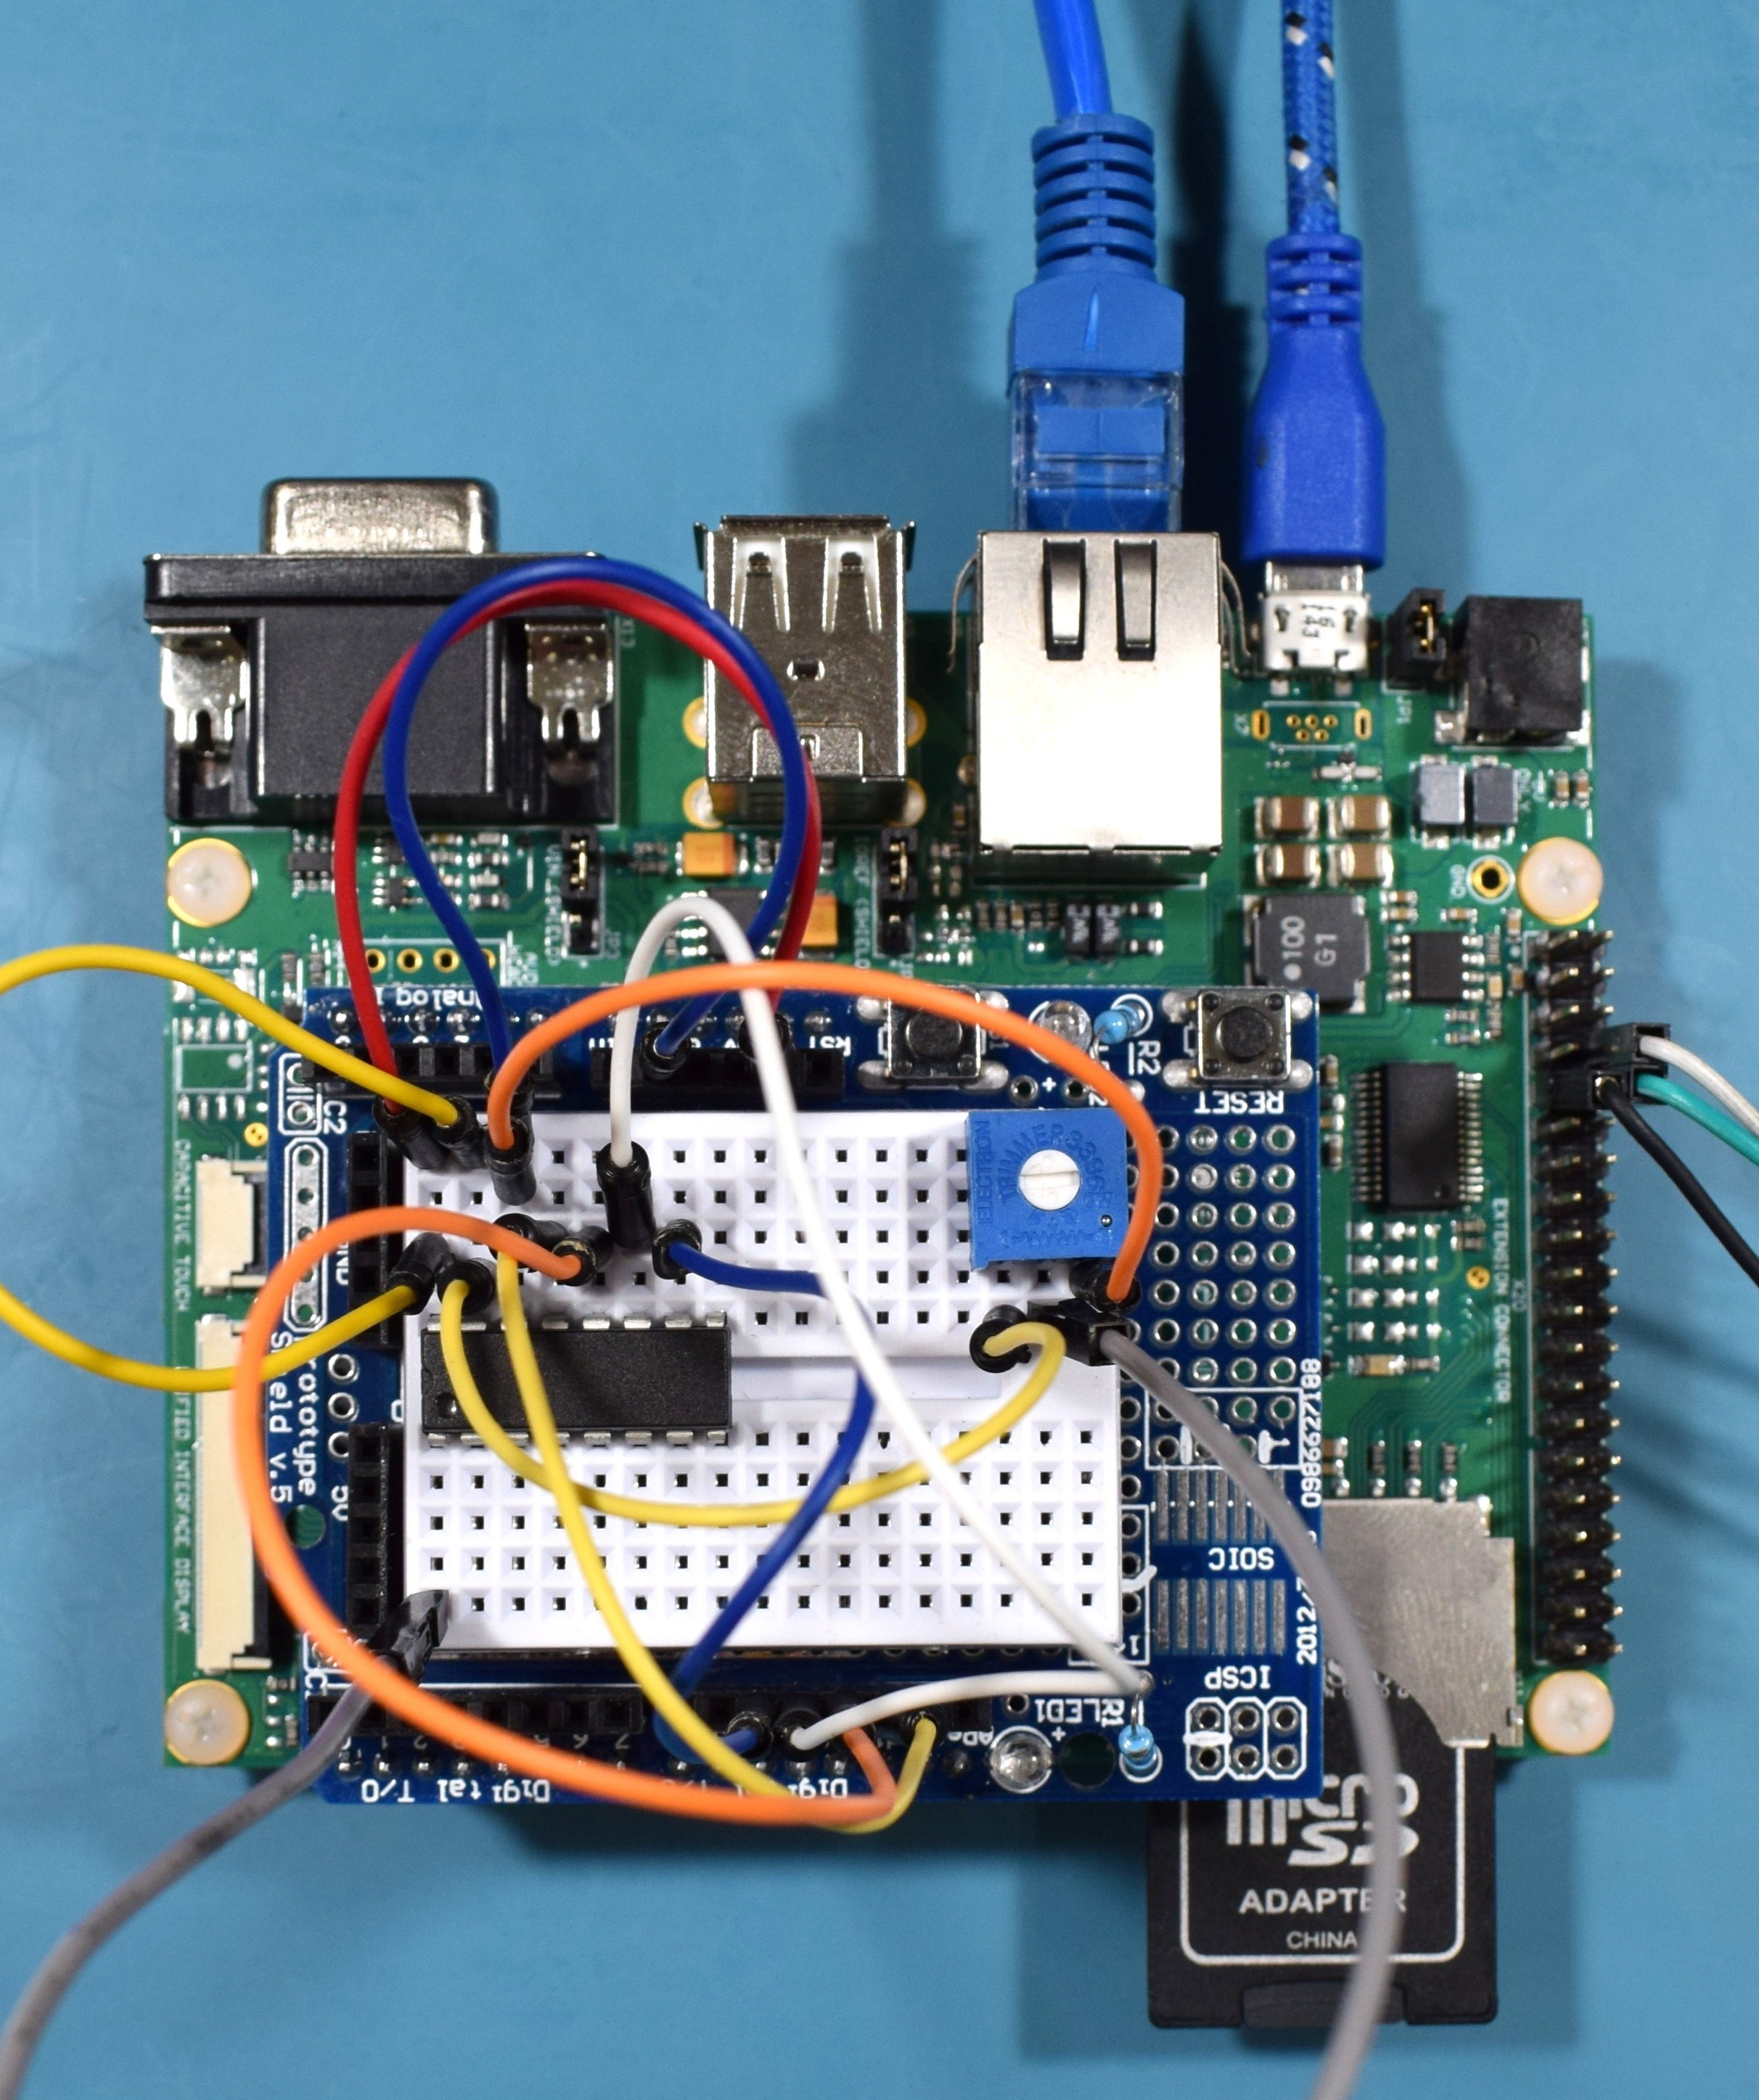
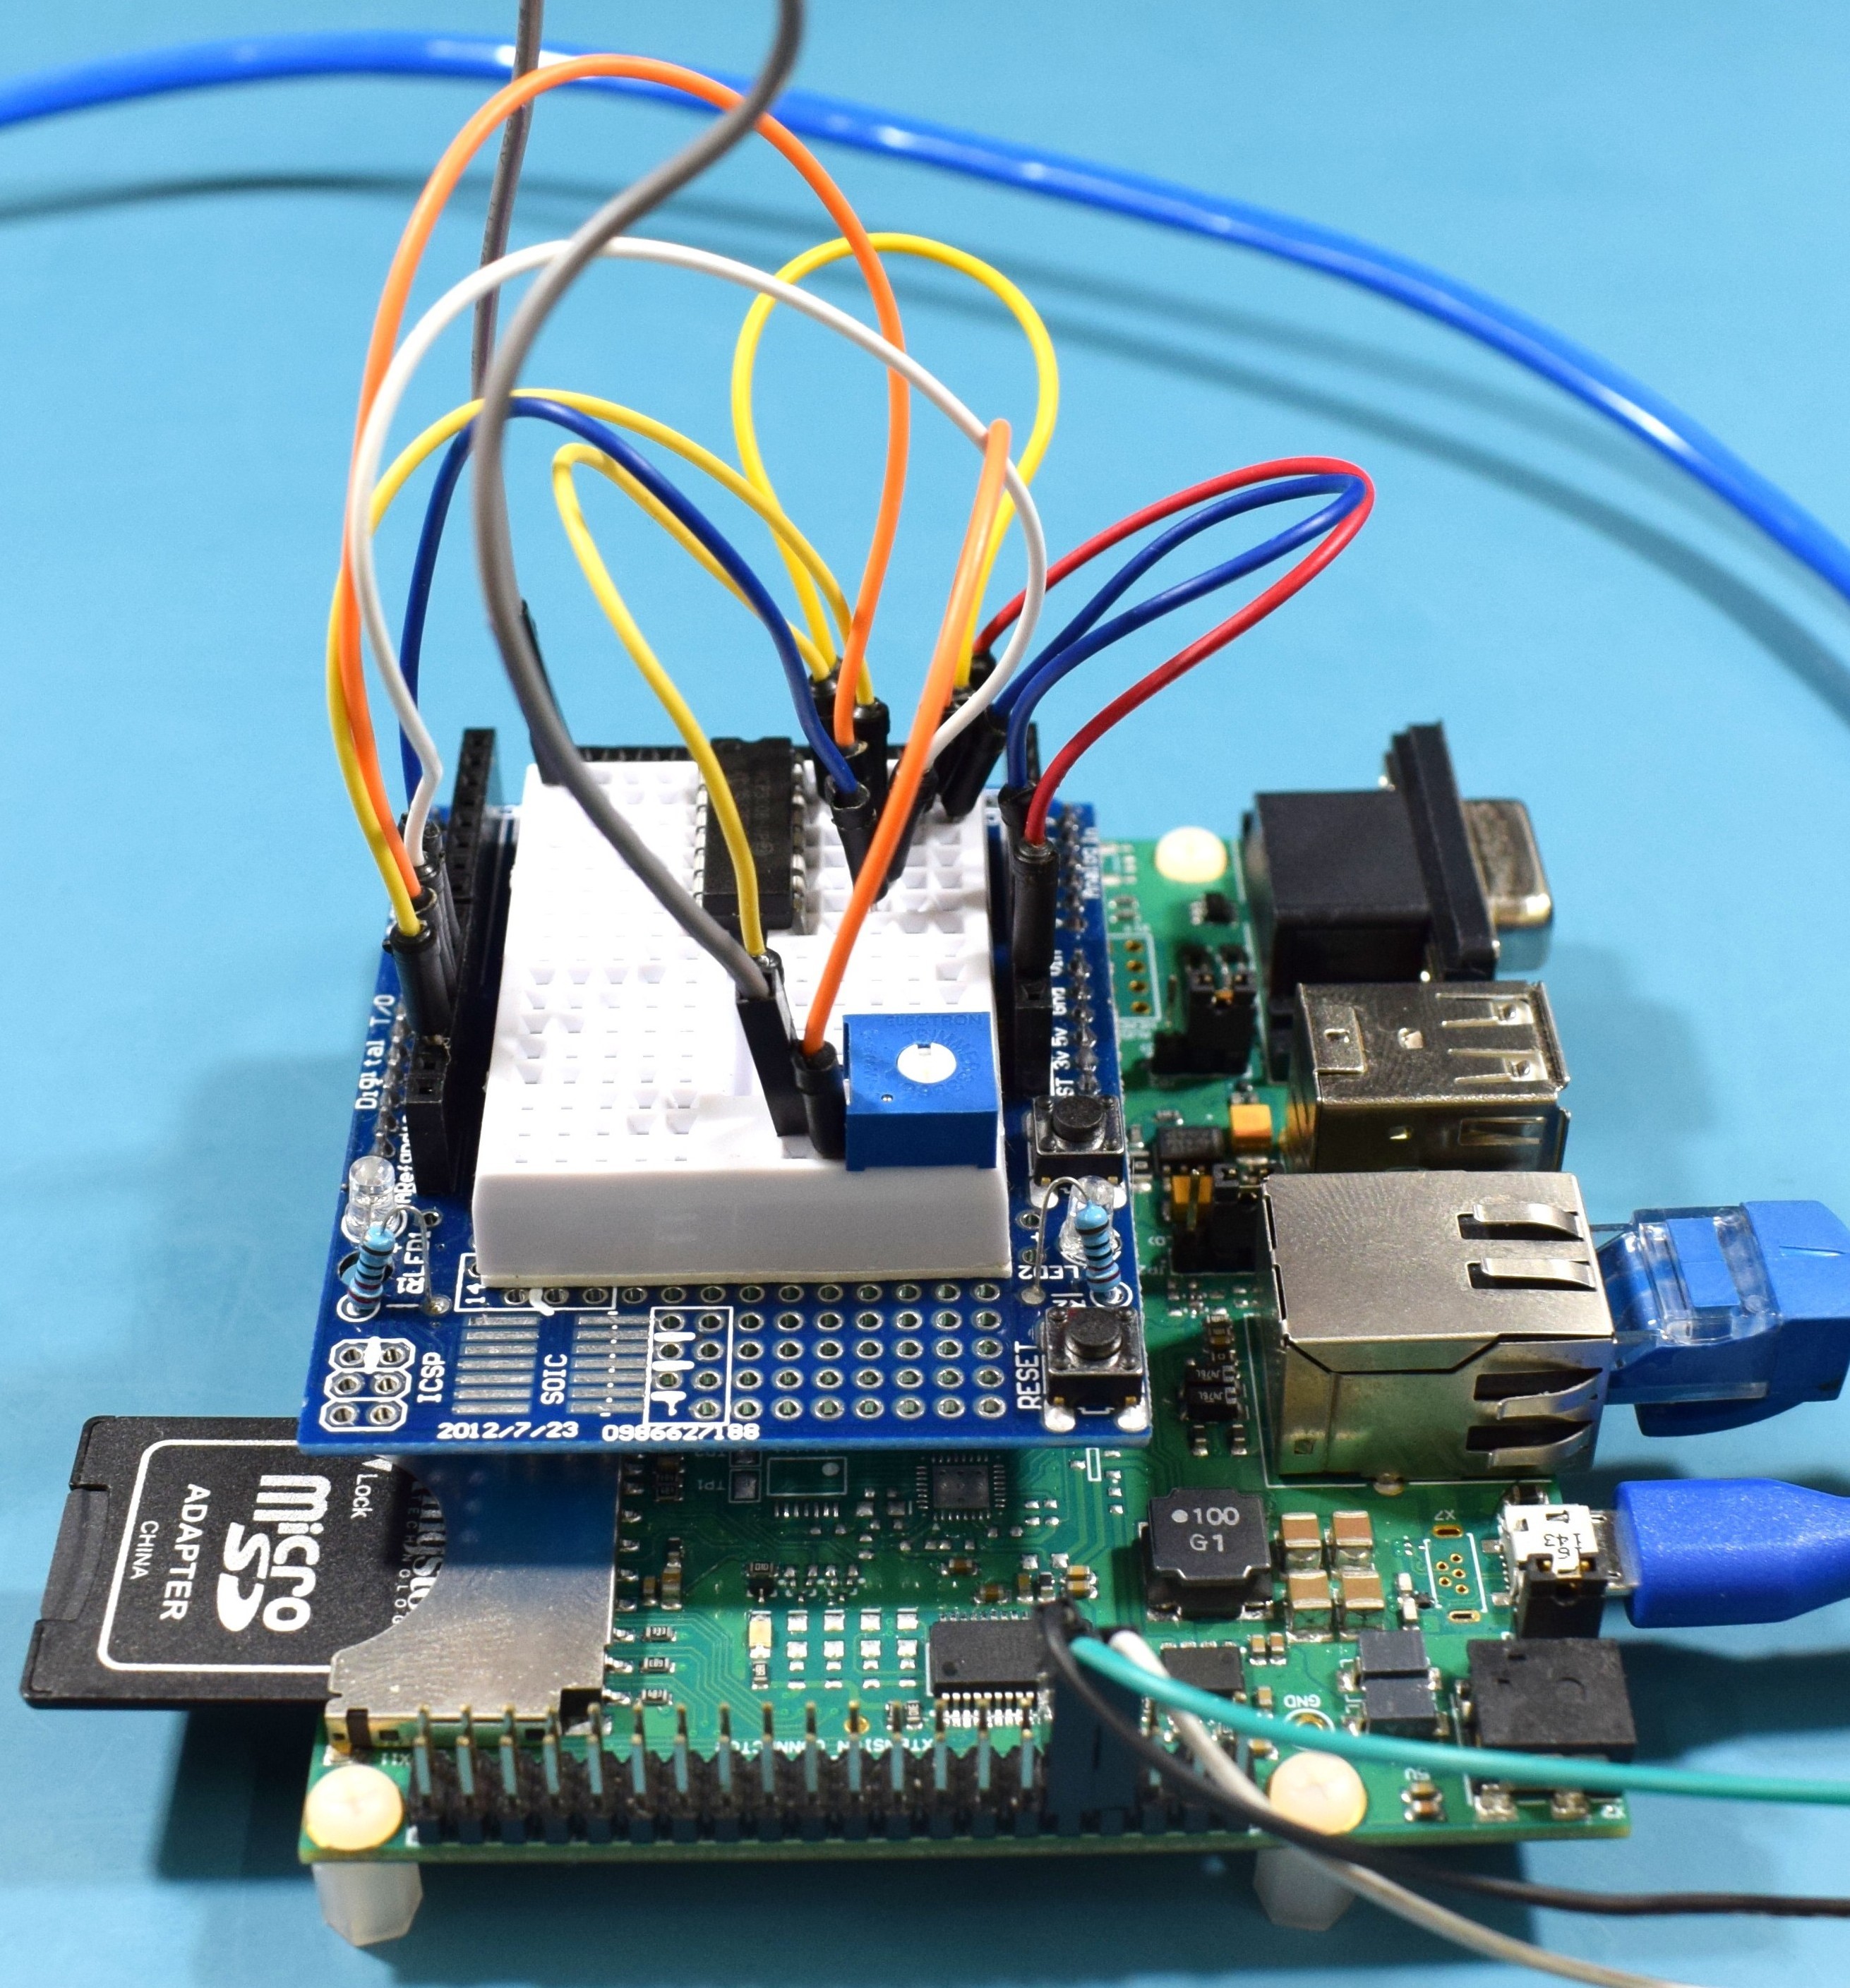
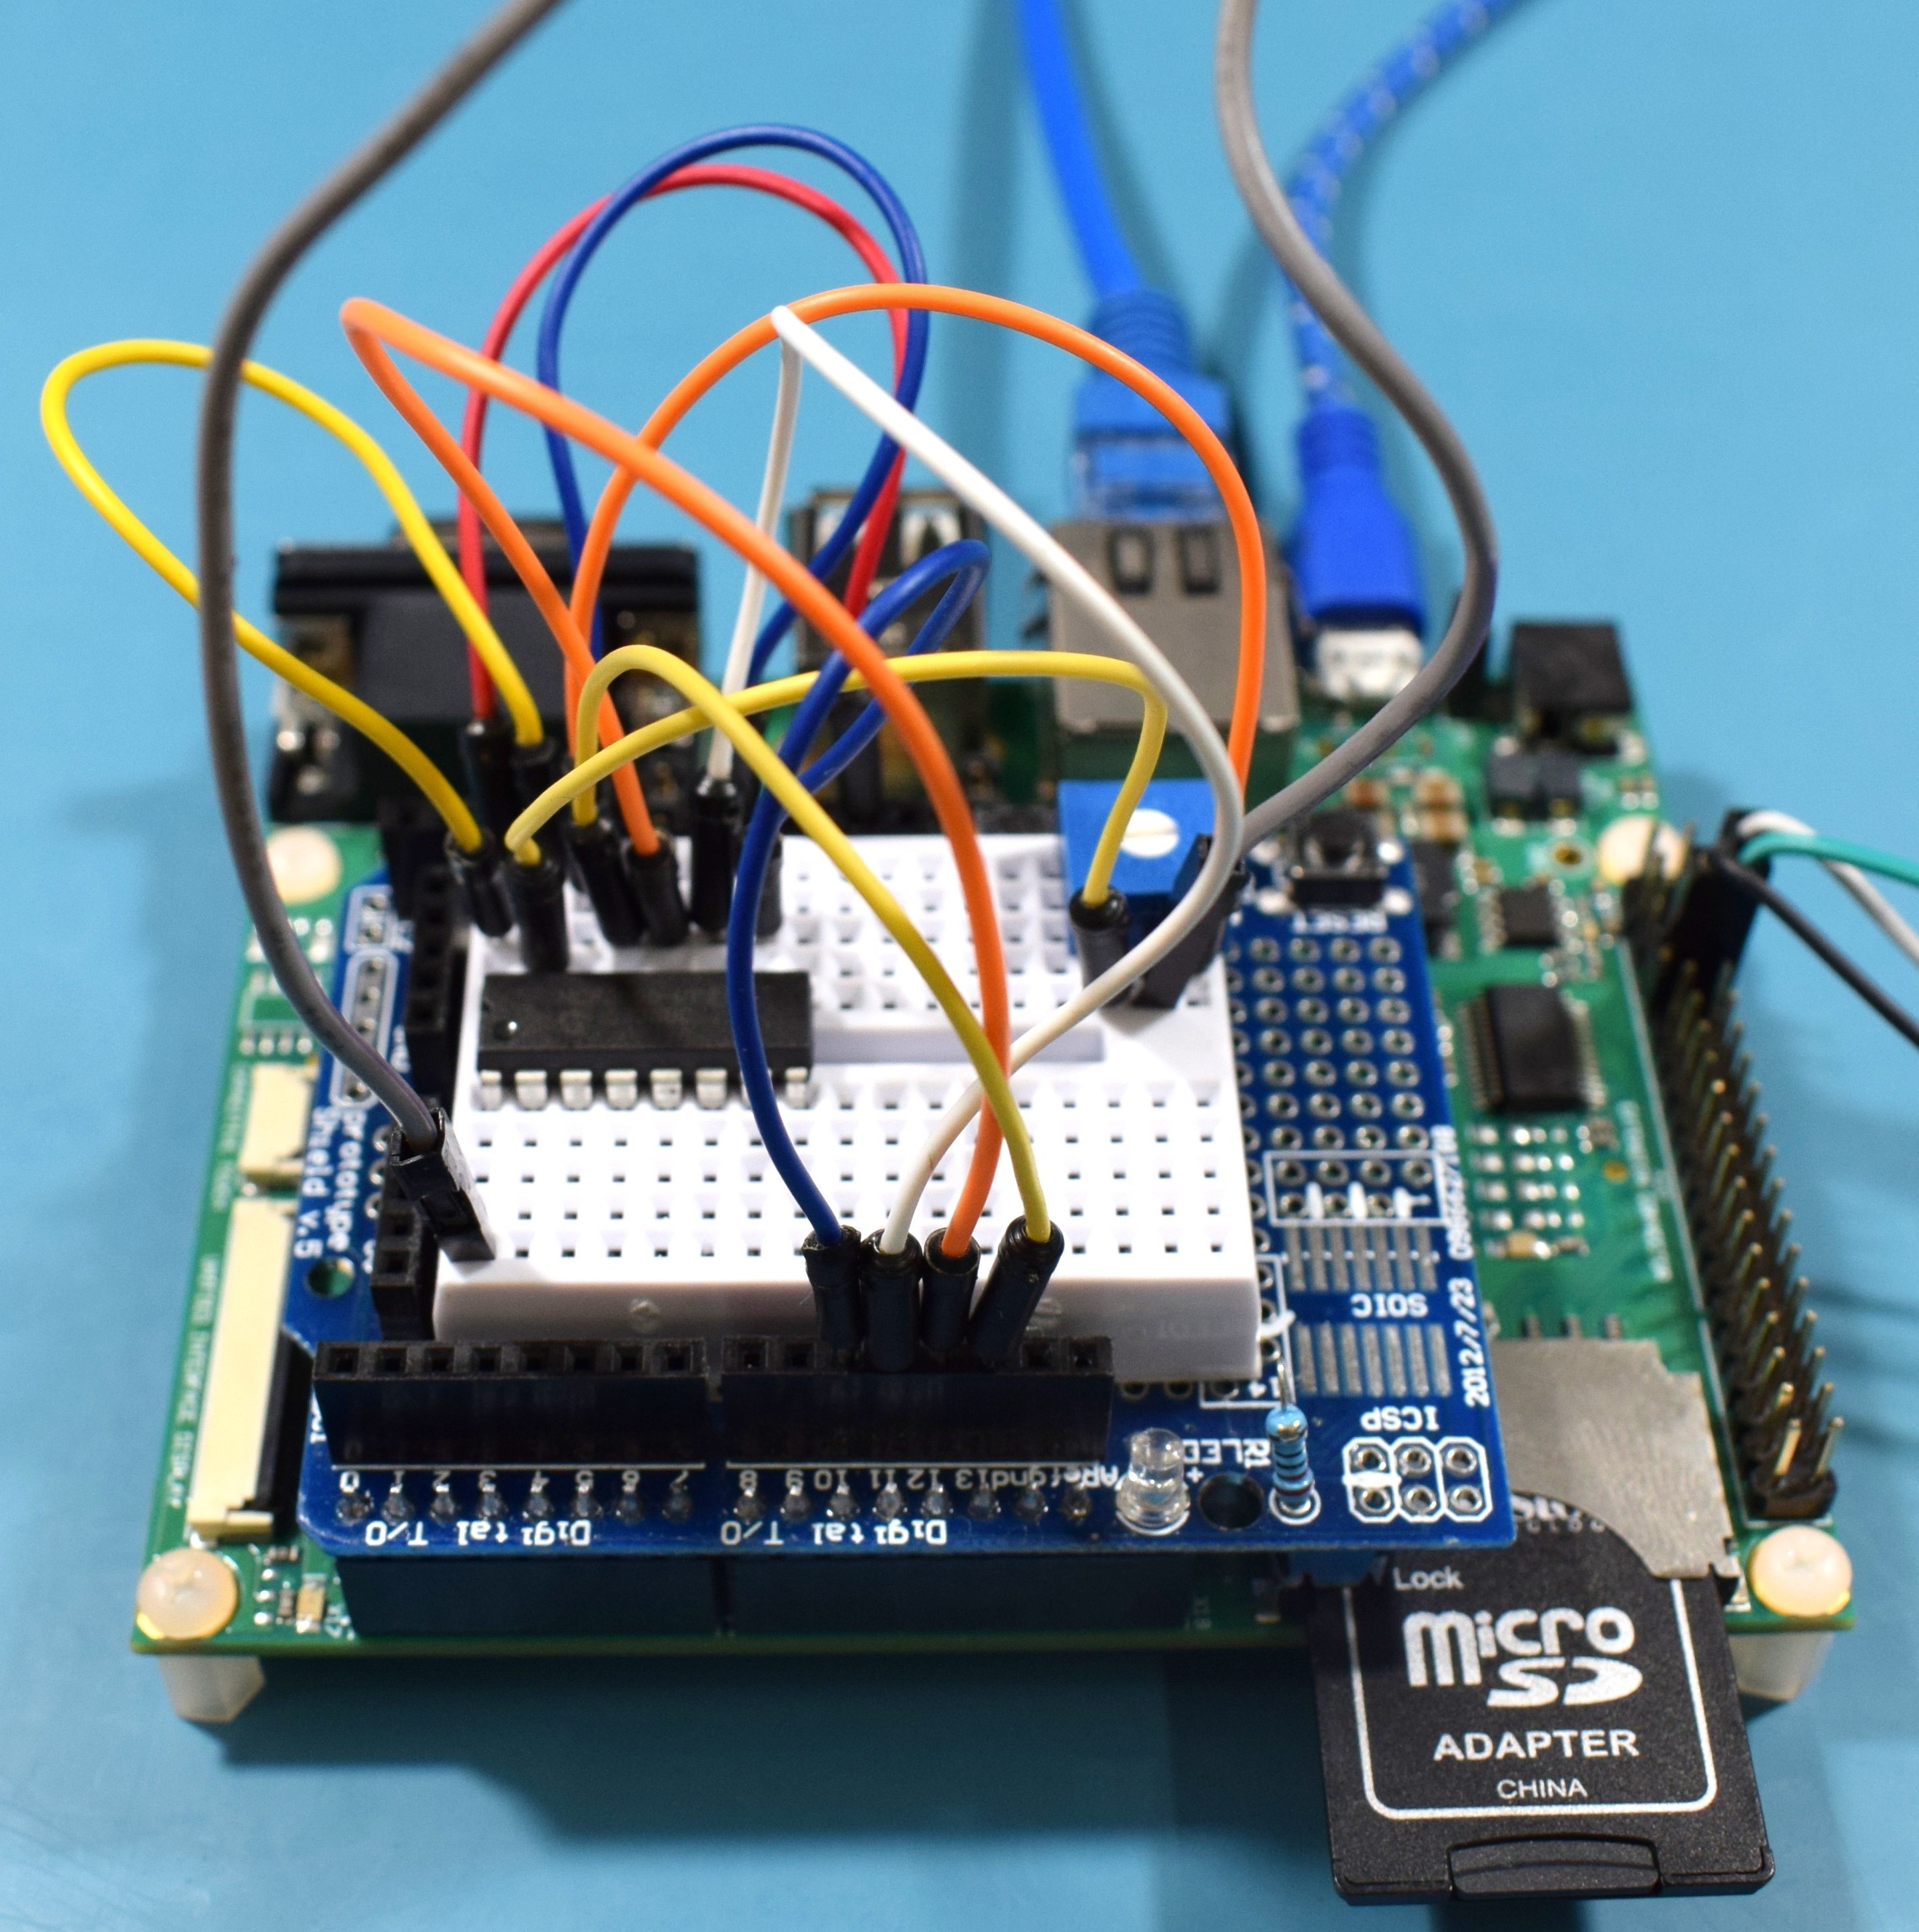
In the previous example, we only compiled and executed the code. Now, let’s modify the code to communicate via SPI with the chip MCP3008 from Microchip. This chip is a 10-bit Analog to Digital converter with 8 single ended inputs. Connect the wires to the Aster and to a breadboard as presented in the picture below:
For those who prefer to use the Eclipse IDE, it is possible to use CMake to generate Eclipse project files. The Cmake -G parameter allows to configure a “build system generator”. Make sure that “build_all.sh” specifies the “Eclipse CDT4 – Unix Makefiles” generator.
In the armgcc sample directory:
[raul@localhost armgcc]$ vi build_all.sh
#!/bin/sh
cmake -DCMAKE_TOOLCHAIN_FILE="../../../../../../../tools/cmake_toolchain_files/armgcc.cmake" -G "Eclipse CDT4 - Unix Makefiles" -DCMAKE_BUILD_TYPE=Debug  .
make -j4
cmake -DCMAKE_TOOLCHAIN_FILE="../../../../../../../tools/cmake_toolchain_files/armgcc.cmake" -G "Eclipse CDT4 - Unix Makefiles" -DCMAKE_BUILD_TYPE=Release  .
make -j4
Next, execute again the “build_all.sh” script:
[raul@localhost armgcc]$ ./build_all.sh
[raul@localhost armgcc]$ ls .cproject .project
.cproject  .project
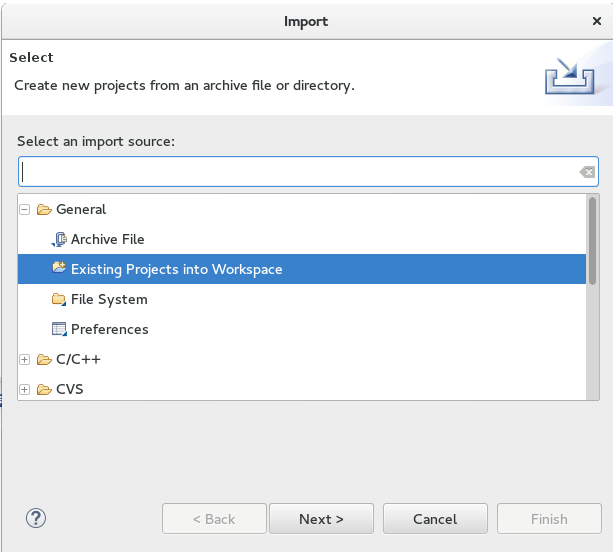
Open Eclipse and import the project:
File > Import…
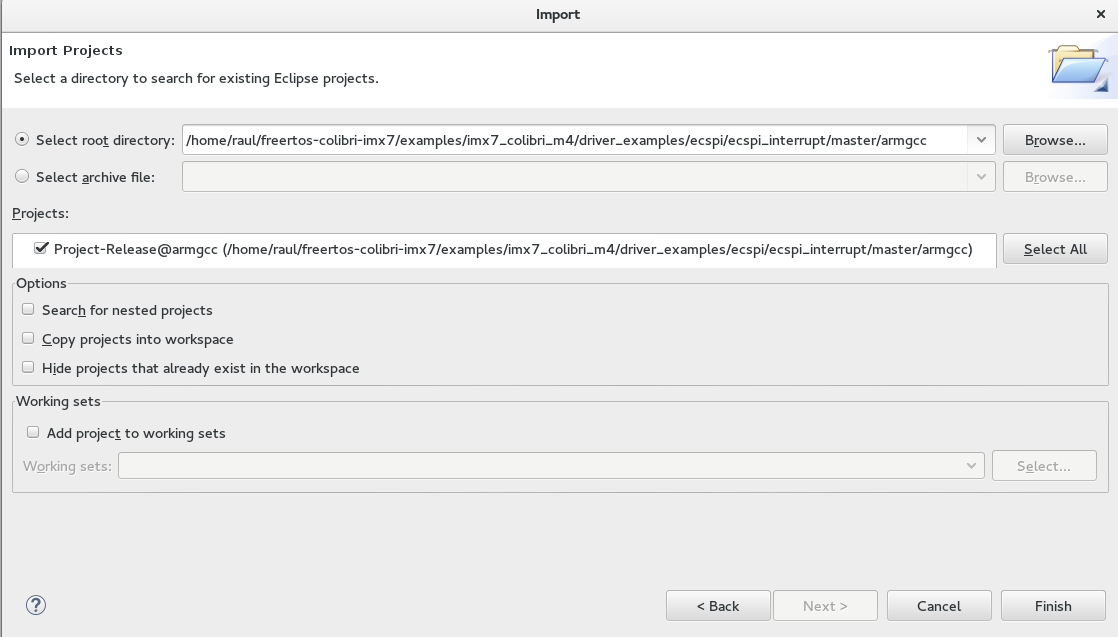
In “Select root directory”, enter the path of the “armgcc” folder of your project:
/home/raul/freertos-colibri-imx7/examples/imx7_colibri_m4/driver_examples/ecspi/ecspi_interrupt/master/armgcc
Open the file “main.c” in the directory.
[TARGET] → [exec]ecspi_interrupt_master_example → Source Files
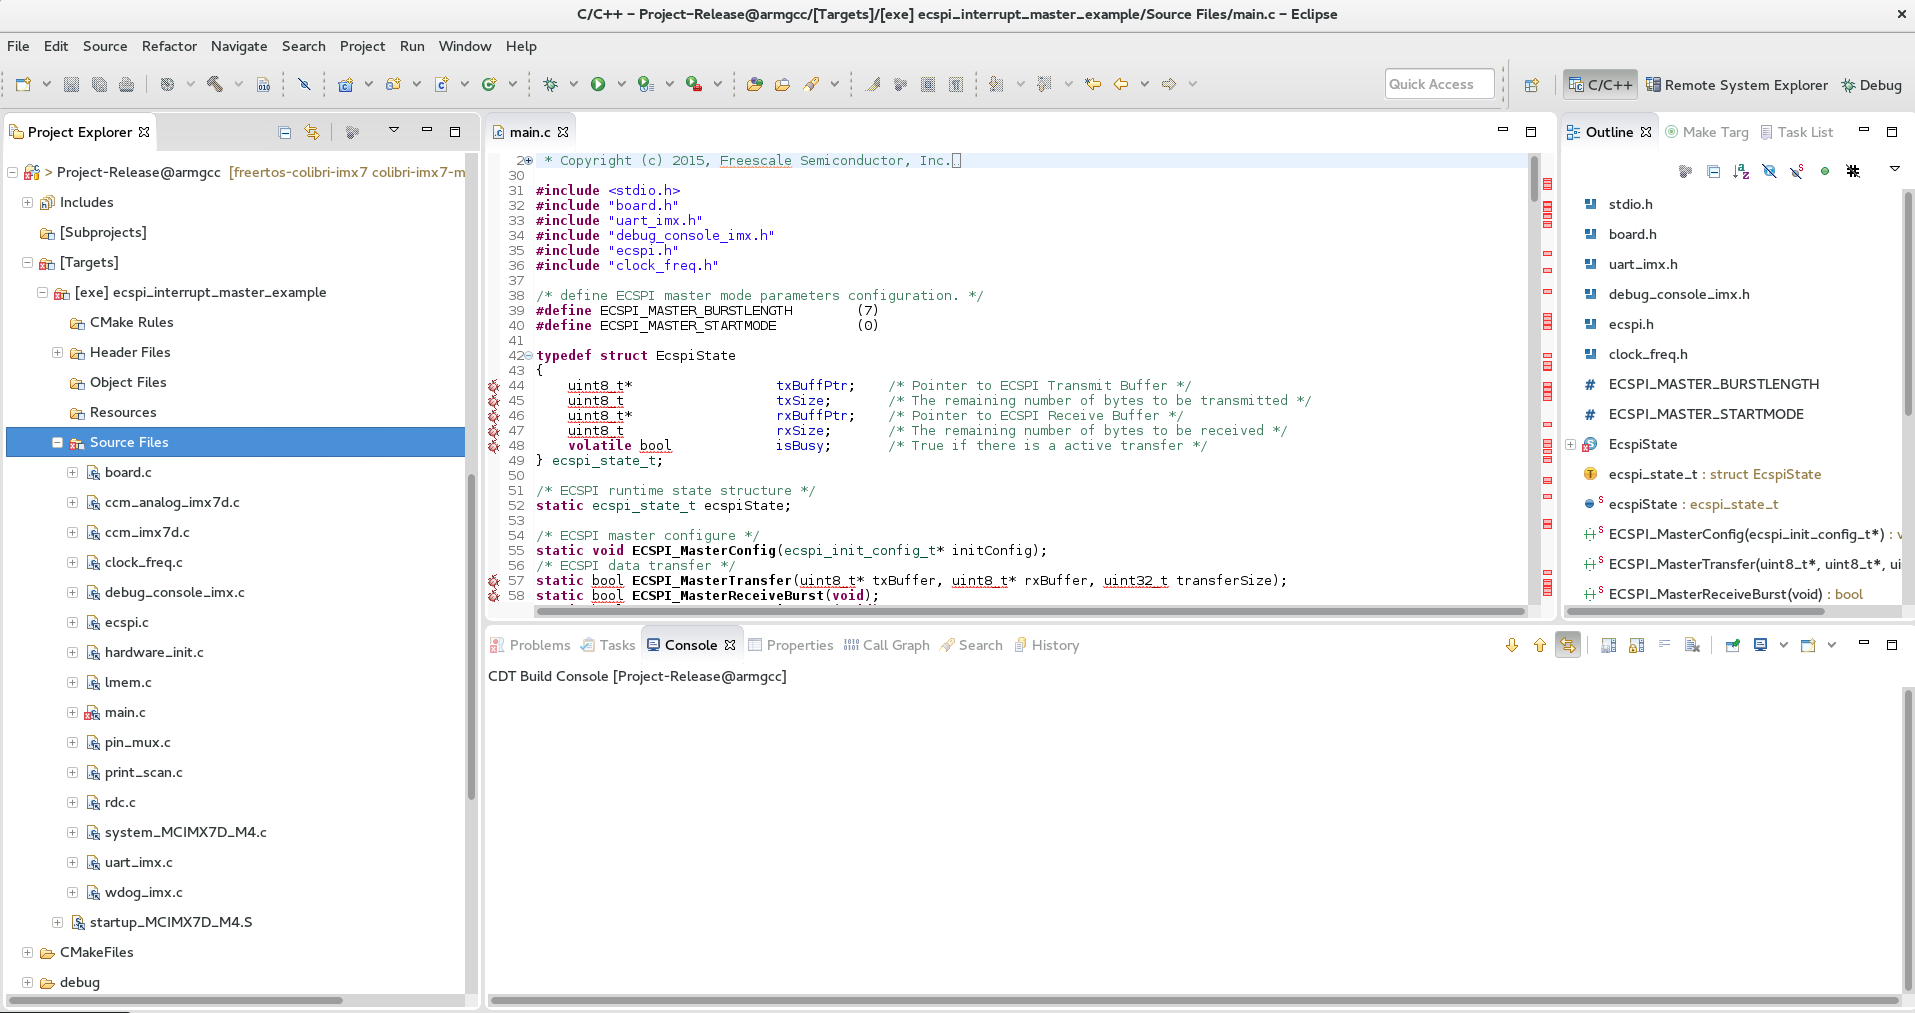
Note that the standard example is quite simple. It is important to show some points of the code to understand clearly where to look in the next examples.
int main(void)
{
    uint8_t control_char;
    uint8_t i;

    ecspi_init_config_t ecspiMasterInitConfig = {
        .baudRate = 500000,
        .mode = ecspiMasterMode,
        .burstLength = ECSPI_MASTER_BURSTLENGTH,
        .channelSelect = BOARD_ECSPI_CHANNEL,
        .clockPhase = ecspiClockPhaseSecondEdge,
        .clockPolarity = ecspiClockPolarityActiveHigh,
        .ecspiAutoStart = ECSPI_MASTER_STARTMODE
    };

    /* Hardware initialize, include RDC, CLOCK, IOMUX, ENABLE MODULE */
    hardware_init();

    /* Update clock frequency of this module */
    ecspiMasterInitConfig.clockRate = get_ecspi_clock_freq(BOARD_ECSPI_BASEADDR);

    PRINTF("\n-------------- ECSPI master driver example --------------\n\n\r");
    PRINTF("This example application demonstrates usage of SPI driver in master mode.\n\r");
    PRINTF("It transfers data to/from remote MCU in SPI slave mode.\n\r");

    /* Ecspi module initialize, include configure parameters */
    ECSPI_MasterConfig(&ecspiMasterInitConfig);

    /* Wait slave ready, then press 's' to start communication. */
    while(true)
    {
        PRINTF("Press \"s\" when spi slave is ready.\n\r");
        control_char = GETCHAR();
        if((control_char == 's') || (control_char == 'S'))
            break;
    }
    /* Send 1~20 to slave and receive data from slave */
    for(i = 0; i < 20; i++)
    {
        txData[0]++;
        ECSPI_MasterTransfer((uint8_t*)txData, (uint8_t*)rxData, 1);
        while(ECSPI_MasterGetTransferStatus());
        PRINTF("MASTER: Transmited data: %d \n\r", txData[0]);
        PRINTF("      : Received data: %d \n\n\r", rxData[0]);
    }
    while(1);
}
The first item that is interesting to note is where the pin multiplexing configuration occurs. In our case, we are using the standard SPI. Right–click on the “hardware_init();” function and select “Open Declaration”
void hardware_init(void)
{
    /* Board specific RDC settings */
    BOARD_RdcInit();
    /* Board specific clock settings */
    BOARD_ClockInit();
    /* initialize debug uart */
    dbg_uart_init();

    /* RDC ECSPI */
    RDC_SetPdapAccess(RDC, BOARD_ECSPI_RDC_PDAP, 3 << (BOARD_DOMAIN_ID * 2), false, false);
    /* Select board ecspi clock derived from OSC clock(24M) */
    CCM_UpdateRoot(CCM, BOARD_ECSPI_CCM_ROOT, ccmRootmuxEcspiOsc24m, 0, 0);
    /* Enable ecspi clock gate */
    CCM_EnableRoot(CCM, BOARD_ECSPI_CCM_ROOT);
    CCM_ControlGate(CCM, BOARD_ECSPI_CCM_CCGR, ccmClockNeededAll);
    /* Configure ecspi pin IOMUX */
    configure_ecspi_pins(BOARD_ECSPI_BASEADDR);
}
Note that the main hardware initialization /configuration are in this function. The configuration of the SPI pins is in the last function, called “configure_ecspi_pins(BOARD_ECSPI_BASEADDR);”.
void configure_ecspi_pins(ECSPI_Type* base)
{
	// ECSPI1 iomux configuration
	/* daisy chain selection */
	IOMUXC_ECSPI3_MISO_SELECT_INPUT = 0;  //(I2C1_SCL  SODIM 90)
	IOMUXC_ECSPI3_MOSI_SELECT_INPUT = 0;  //(I2C1_SCL  SODIM 90)

	/* iomux */
	IOMUXC_SW_MUX_CTL_PAD_I2C2_SCL = IOMUXC_SW_MUX_CTL_PAD_I2C2_SCL_MUX_MODE(3);    /* ECSPI SLK  */
	IOMUXC_SW_MUX_CTL_PAD_I2C1_SDA = IOMUXC_SW_MUX_CTL_PAD_I2C1_SDA_MUX_MODE(3);    /* ECSPI MOSI */
	IOMUXC_SW_MUX_CTL_PAD_I2C1_SCL = IOMUXC_SW_MUX_CTL_PAD_I2C1_SCL_MUX_MODE(3);    /* ECSPI MISO  */
	IOMUXC_SW_MUX_CTL_PAD_I2C2_SDA  = IOMUXC_SW_MUX_CTL_PAD_I2C2_SDA_MUX_MODE(3);     /* ECSPI SS0 */

	/* pad control */
	IOMUXC_SW_PAD_CTL_PAD_I2C2_SCL =    IOMUXC_SW_PAD_CTL_PAD_I2C2_SCL_PE_MASK  |
			IOMUXC_SW_PAD_CTL_PAD_I2C2_SCL_PS(0)    |      /* pull down */
			IOMUXC_SW_PAD_CTL_PAD_I2C2_SCL_DSE(0)   |
			IOMUXC_SW_PAD_CTL_PAD_I2C2_SCL_HYS_MASK;

	IOMUXC_SW_PAD_CTL_PAD_I2C1_SDA = IOMUXC_SW_PAD_CTL_PAD_I2C1_SDA_DSE(0)   |
			IOMUXC_SW_PAD_CTL_PAD_I2C1_SDA_HYS_MASK;

	IOMUXC_SW_PAD_CTL_PAD_I2C1_SCL = IOMUXC_SW_PAD_CTL_PAD_I2C1_SCL_HYS_MASK;

	IOMUXC_SW_PAD_CTL_PAD_I2C2_SDA  =  IOMUXC_SW_PAD_CTL_PAD_I2C2_SDA_PE_MASK   |
			IOMUXC_SW_PAD_CTL_PAD_I2C2_SDA_PS(3)     |      /* pull up */
			IOMUXC_SW_PAD_CTL_PAD_I2C2_SDA_DSE(0)    |
			IOMUXC_SW_PAD_CTL_PAD_I2C2_SDA_HYS_MASK;
}
Another important file is “board.h”. If in the same function, you search for the definition of "BOARD_ECSPI_BASEADDR" in "configure_ecspi_pins (BOARD_ECSPI_BASEADDR);" you will see a part of the file “board.h” which sets up more things related to SPI, for example the interruption vector.
/* Colibri SPI is ECSPI3 */
#define BOARD_ECSPI_RDC_PDAP                rdcPdapEcspi3
#define BOARD_ECSPI_CCM_ROOT                ccmRootEcspi3
#define BOARD_ECSPI_CCM_CCGR                ccmCcgrGateEcspi3
#define BOARD_ECSPI_BASEADDR                ECSPI3
#define BOARD_ECSPI_CHANNEL                 ecspiSelectChannel0
#define BOARD_ECSPI_IRQ_NUM                 eCSPI3_IRQn
#define BOARD_ECSPI_HANDLER                 eCSPI3_Handler
Returning to “main.c”, we will change the main loop to get the data from MCP3008. More specifically, we will read the channel 0 of the chip.
/* Wait slave ready, then press 's' to start communication. */
    while(true)
    {
        PRINTF("Press \"s\" when spi slave is ready.\n\r");
        control_char = GETCHAR();
        if((control_char == 's') || (control_char == 'S'))
            break;
    }
Remove the “break” and add the code below. According the datasheet of MCP3008, the sequence “00000001 10000000 00000000”, which means the start bit, channel selection and the complement of information to form 10 bits of data, respectively.
/* Wait slave ready, then press 's' to start communication. */
	while(true)
	{
		PRINTF("Press \"s\" when spi slave is ready.\n\r");
		control_char = GETCHAR();
		if((control_char == 's') || (control_char == 'S'))
		{
			unsigned char datatx[3];
			unsigned char datarx[3];
			datatx[0] = 0b00000001;  //  first byte transmitted -> start bit
			datatx[1] = 0b10000000; // second byte transmitted -> (SGL/DIF = 1, D2=D1=D0=0)
			datatx[2] = 0b00000000; // third byte transmitted....don't care

			/* SPI Read */
			ECSPI_MasterTransfer((uint8_t*)&datatx[0], (uint8_t*)&datarx[0], 3);
			while(ECSPI_MasterGetTransferStatus());
			PRINTF("Transmited data: %d \n\r", datatx[0]);
			PRINTF("Transmited data: %d \n\r", datatx[1]);
			PRINTF("Transmited data: %d \n\r", datatx[2]);
			PRINTF("Received data: %d \n\n\r", datarx[0]);
			PRINTF("Received data: %d \n\n\r", datarx[1]);
			PRINTF("Received data: %d \n\n\r", datarx[2]);
			unsigned int a2dVal = 0;
			a2dVal = (datarx[1]<< 8) & 0b1100000000; //merge data[1] & data[2] to get result
			a2dVal |=  (datarx[2] & 0xff);

			PRINTF("data = %d \n\n\r", a2dVal);
		}
	}
After changing the example, the function “int main (void)” should look like this:
int main(void)
{
	uint8_t control_char;
	uint8_t i;

	ecspi_init_config_t ecspiMasterInitConfig = {
			.baudRate = 500000,
			.mode = ecspiMasterMode,
			.burstLength = ECSPI_MASTER_BURSTLENGTH,
			.channelSelect = BOARD_ECSPI_CHANNEL,
			.clockPhase = ecspiClockPhaseSecondEdge,
			.clockPolarity = ecspiClockPolarityActiveHigh,
			.ecspiAutoStart = ECSPI_MASTER_STARTMODE
	};

	/* Hardware initialize, include RDC, CLOCK, IOMUX, ENABLE MODULE */
	hardware_init();

	/* Update clock frequency of this module */
	ecspiMasterInitConfig.clockRate = get_ecspi_clock_freq(BOARD_ECSPI_BASEADDR);

	PRINTF("\n-------------- ECSPI master driver example --------------\n\n\r");
	PRINTF("This example application demonstrates usage of SPI driver in master mode.\n\r");
	PRINTF("It transfers data to/from remote MCU in SPI slave mode.\n\r");

	/* Ecspi module initialize, include configure parameters */
	ECSPI_MasterConfig(&ecspiMasterInitConfig);

	/* Wait slave ready, then press 's' to start communication. */
	while(true)
	{
		PRINTF("Press \"s\" when spi slave is ready.\n\r");
		control_char = GETCHAR();
		if((control_char == 's') || (control_char == 'S'))
		{
			unsigned char datatx[3];
			unsigned char datarx[3];
			datatx[0] = 0b00000001;  //  first byte transmitted -> start bit
			datatx[1] = 0b10000000; // second byte transmitted -> (SGL/DIF = 1, D2=D1=D0=0)
			datatx[2] = 0b00000000; // third byte transmitted....don't care

			/* SPI Read */
			ECSPI_MasterTransfer((uint8_t*)&datatx[0], (uint8_t*)&datarx[0], 3);
			while(ECSPI_MasterGetTransferStatus());
			PRINTF("Transmited data: %d \n\r", datatx[0]);
			PRINTF("Transmited data: %d \n\r", datatx[1]);
			PRINTF("Transmited data: %d \n\r", datatx[2]);
			PRINTF("Received data: %d \n\n\r", datarx[0]);
			PRINTF("Received data: %d \n\n\r", datarx[1]);
			PRINTF("Received data: %d \n\n\r", datarx[2]);

			unsigned int a2dVal = 0;
			a2dVal = (datarx[1]<< 8) & 0b1100000000; //merge data[1] & data[2] to get result
			a2dVal |=  (datarx[2] & 0xff);

			PRINTF("data = %d \n\n\r", a2dVal);
		}
	}
}
Recompile the binary, copy by SD Card or Ethernet according the previous example and execute the binary.
SD Card:
[raul@localhost release]$ df
Filesystem              1K-blocks      Used Available Use% Mounted on
/dev/sdb1                 7780496    469540   7310956   7% /run/media/raul/DATA
[raul@localhost release]$ cp ecspi_interrupt_master_example.bin /run/media/raul/DATA
[raul@localhost release]$ umount /run/media/raul/DATA
Ethernet:
[raul@localhost release]$ cp ecspi_interrupt_master_example.bin /srv/tftp/
Insert the SD card on the board or set up the network and execute the binary.
SD Card:
Colibri iMX7 # fatload mmc 0:1 0x7F8000 ecspi_interrupt_master_example.bin
reading ecspi_interrupt_master_example.bin
9956 bytes read in 20 ms (485.4 KiB/s)
Ethernet:
Colibri iMX7 # tftp 0x7F8000 ecspi_interrupt_master_example.bin
Using FEC0 device
TFTP from server 192.168.0.150; our IP address is 192.168.0.170
Filename 'ecspi_interrupt_master_example.bin'.
Load address: 0x7f8000
Loading: ##################################################  9.7 KiB
	 647.5 KiB/s
done
Bytes transferred = 9956 (26e4 hex)
Once the firmware is loaded properly, it does not matter which method you are using, run the command to execute the binary loaded on Cortex-M.
Colibri iMX7 # dcache flush
Colibri iMX7 # bootaux 0x7F8000
## Starting auxiliary core at 0x007F8000 ...
Colibri iMX7 #
New with the alternate version of the code, pressing the bottom “s” on terminal UART B shows a new analog acquisition on channel 0.
After these U-boot commands, you may want to run the “boot” command to boot the Linux. The problem is that our example is using the UART B and the SPI. To start the Linux without problem, it is necessary to modify the device tree to tell Linux to not use these resources.
To temporarily disable UART B and SPI without changing the device tree, you can use the U-boot command below:
Colibri iMX7 # setenv fdt_fixup 'fdt addr ${fdt_addr_r} && fdt rm /soc/aips-bus@30800000/spba-bus@30800000/serial@30890000  && fdt rm /soc/aips-bus@30800000/spba-bus@30800000/ecspi@30840000'
Colibri iMX7 # saveenv
Saving Environment to NAND...
Erasing NAND...
Erasing at 0x380000 -- 100% complete.
Writing to NAND... OK
More information about device tree customization is available in this article on the Toradex Developer Website
In my case, I used to load the binary of Cortex-M by Ethernet. An interesting way to save time is to automate the copy of the binary to the “/dev/tftp/” directory. To do this, at the root of you project, open the file:
raul@localhost master]$ vi armgcc/CMakeLists.txt
Add the following line at the end of the file:
[raul@localhost master]$ vi armgcc/CMakeLists.txt ADD_CUSTOM_COMMAND(TARGET ${Project_Name}_Main POST_BUILD COMMAND cp ${EXECUTABLE_OUTPUT_PATH}/ecspi_interrupt_master_example.bin /srv/tftp/m4.bin)
Run the script “./build_all.sh” again and when compiling by eclipse, you should see the command running automatically on the “console”:
cp /home/raul/freertos-colibri-imx7/examples/imx7_colibri_m4/driver_examples/ecspi/ecspi_interrupt/master/armgcc/release/ecspi_interrupt_master_example.bin /srv/tftp/m4.bin
Another optimization that helped me a lot was to create the automatic rule in U-boot to load the binary:
Colibri iMX7 # setenv m4 'tftp 0x7F8000 m4.bin && dcache flush && bootaux 0x7F8000'
Colibri iMX7 # setenv bootcmd 'run m4; run ubiboot; setenv fdtfile ${soc}-colibri-${fdt_board}.dtb && run distro_bootcmd;'
Colibri iMX7 # saveenv
Now, every time you turn on the module, it will automatically load the binary and then upload Linux.
In this article, it was possible to learn some of the first steps to implement solutions on heterogeneous multicore processor architecture. Through two examples, we saw how to compile and run codes on the Cortex-M4 of an HMP SoC on the Colibri iMX7 Computer on Module. We also learned that the different cores inside the SoC share the peripheral interfaces, so it is necessary to understand (and plan) which peripheral will be assigned to each core.
The next few articles will explore how to implement inter-core communication.
- http://developer.toradex.com/knowledge-base/ecos-rtos-on-the-cortex-m4-of-a-colibri-vf61
- http://developer.toradex.com/knowledge-base/freertos-on-the-cortex-m4-of-a-colibri-imx7
- http://developer.toradex.com/products/aster-carrier-board
- http://developer.toradex.com/products/colibri-imx7
- http://developer.toradex.com/knowledge-base/flashing-embedded-linux-to-imx7-modules
- http://developer.toradex.com/knowledge-base/real-time-linux
Beni3141 - 6 years 11 months | Reply
Great article! I retraced all your steps on windows and it was quite easy. I used a small tool called "OpenTFTPServer" to host the files on my workstation and the rest was more a less the same.
One thing you should add: in the end also save the changes with "saveenv", otherwhise all the typing was for nothing. :D
Toradex - 6 years 10 months | Reply
Hi Beni, we're glad you liked the article. And thank you very much for the feedback! We have already added "saveenv" after the command. Do stay tuned to the Toradex Blog.